Kia ora! I know it's April but I want to take you back six months to October last year. The weather was beginning to get warmer, daylight savings was about to start and I felt that I needed more casual clothes in my wardrobe. Or was it I was just looking for a quick fix, instant gratification kinda project?!? This is when I decided that I needed another bomber jacket in my life.
I had previously made the Rigel Bomber by Papercut Patterns but at that time I forgot to check the sleeve length, and every time I wear it, it annoys the sh*t out of me. This time I made exactly the same size as my previous jacket, adding 3" to the sleeve length. I made just one other adjustment this time, removing 1/2" from the centre back of the collar piece.
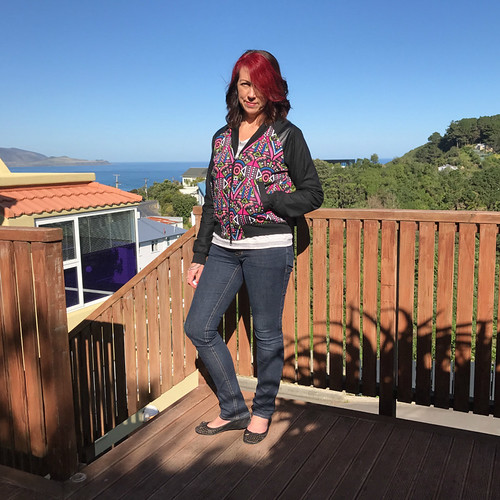
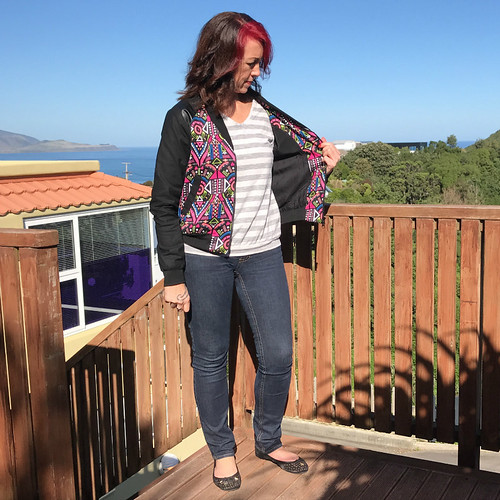
I also wanted to try this pattern using the insets at the top of the raglan sleeve, for that extra effect. I had purchased this aztec cotton lycra online a little while ago and when it arrived I was really surprised at how bright it was - I probably would never have bought it if I had been shopping in a bricks and mortar shop. At the time I had no idea what on earth I would ever use it for, but it turned out perfect for this jacket. I also some faux leather in the stash that I'd bought for something else and used that for the sleeve insets.
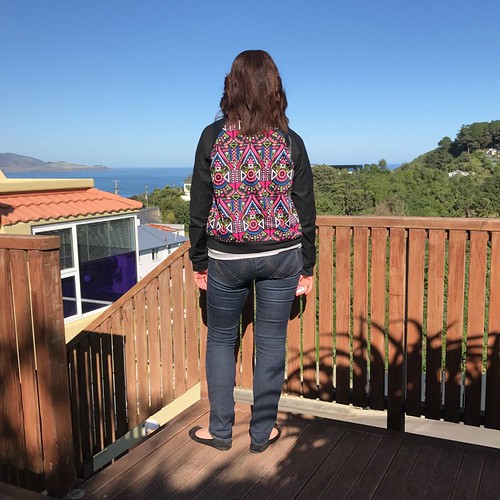
This version is fully lined with silk crepe de chine.
When my daughter found out what I was making, she also decided she wanted one - a cream one of all colours! I was in the zone, it was her birthday, so I didn't put up any objections to making another. Although I was getting rather jealous while making her one, that it was so much better than mine. I selected this honey comb cotton fabric with a gold foil, both from The Fabric Store.
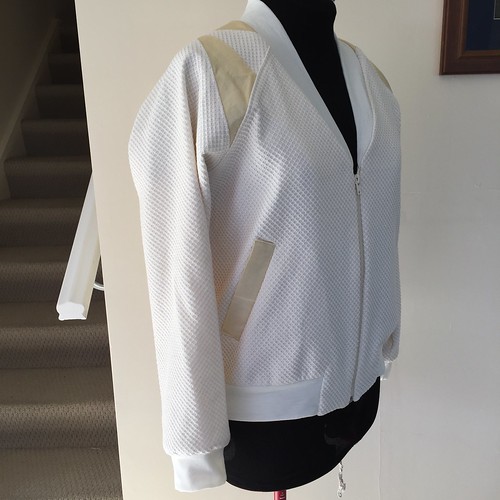
The gold foil was very light weight so I had to interface all of the pieces to get it to a similar weight as the main fabric, well stable enough to hold its own.
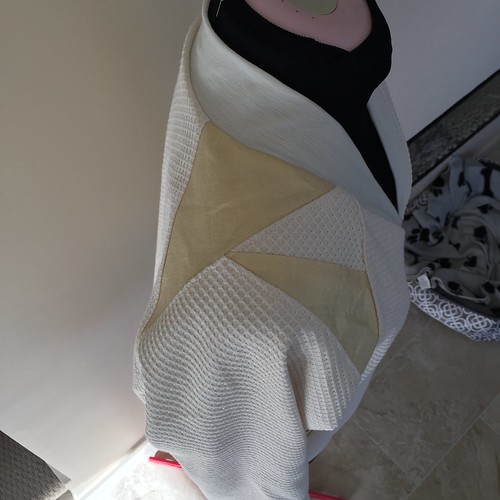
For the ribbing, I settled for a merino knit to get the colour match as close as possible. I just have one regret - that I didn't double the layers in the collar. For the sleeve cuffs and the hem band, I cut two so when it's folded on itself it is four layers thick. It works perfectly with really good recovery. The collar on the other hand feels a bit flimsy.
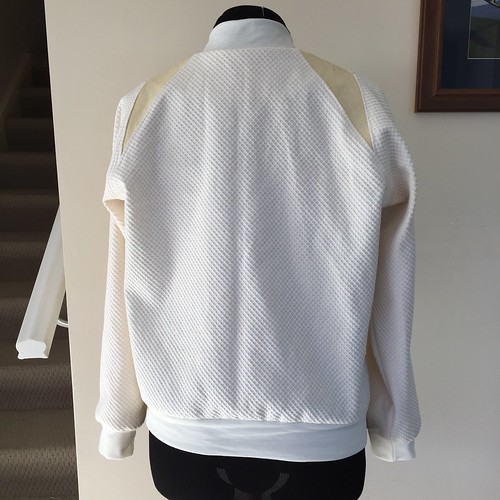
I fully liked this version as well, this time with a cream satin - it feels amazing to wear. Unfortunately this is one size too big for me and the sleeves are short, so wearing it isn't that great. Darn!!!
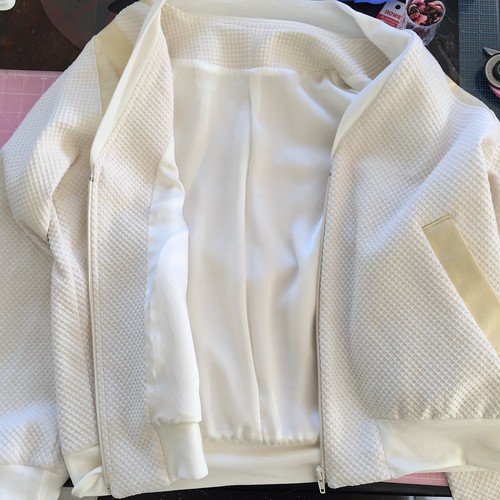
It is so luxurious! It was definitely not cheap - I added up all the fabric and lining and it came out at $110.00! So you can image my reaction when I see it lying on the floor of her room....
Anyway, I had total fun making both these jackets. I wouldn't hesitate to put more of them in my wardrobe. Although next time I might try raising the collar and go for the traditional round neck rather than this V-neck version.
More photos on my Flickr --->
Showing posts with label Bomber. Show all posts
Sunday, 23 April 2017
Tuesday, 27 January 2015
Rigel Bomber Jacket January ft Dragonflies
When it comes to a bomber jacket no longer is it the stereo type of two toned solid colour with a stripe in the cuff, which may have been the 'in thing' when I was back in High School! Skip a few decades and the bomber jacket is still popular but the variety is far from stereo type.
One that really caught my eye recently was worn by Gwen Stefani during her time judging on "The Voice", but do you think I can find it anywhere on the net - NO! But what I did start was a inspiration board on Pinterest, if you're looking for something to spark your bomber craze.
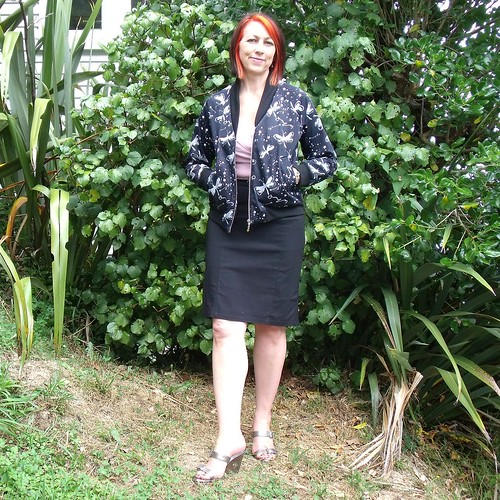
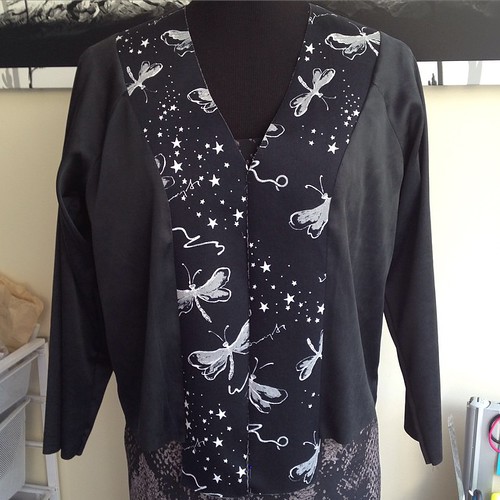
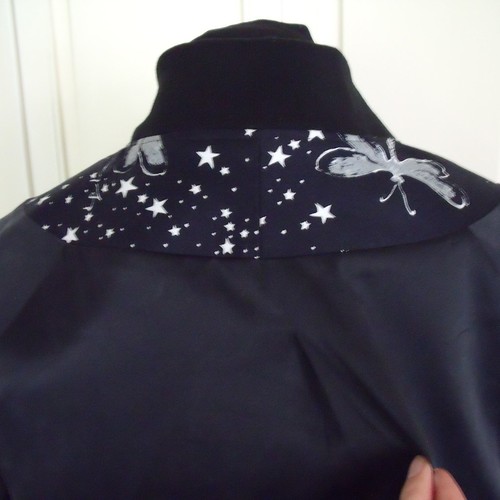
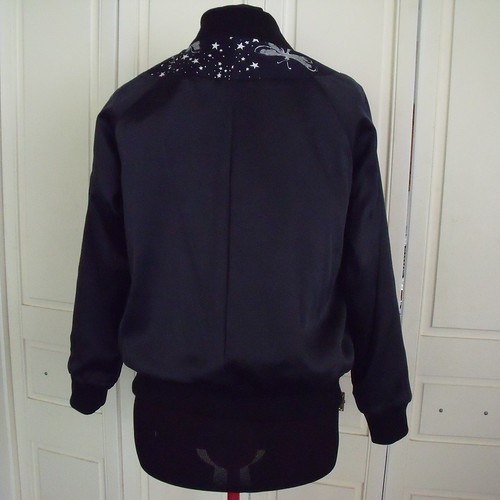
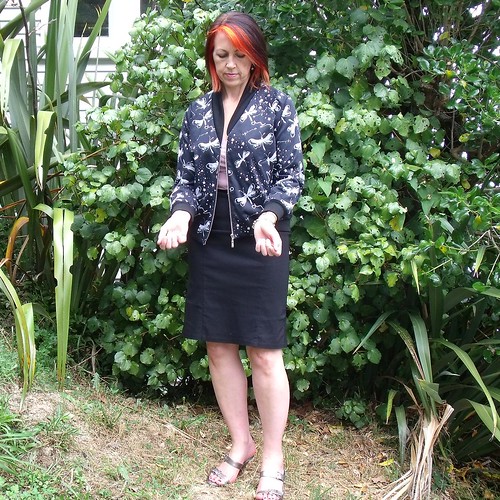
After all that inspiration can you believe it, I settled on a black ... but hey it's got silver and white Dragonflies!
About this time last year I made a satin bomber jacket for my daughter using a Burda pattern. While it was relatively easy to put together what I didn't like was that the zipper was sewn directly to the bottom band and when you put ribbing under the machine foot it squishes and stretches.
So when Sonja, Mel and Kat announced Rigel Bomber Jacket January I was keen to sew along and this time make myself a bomber. And that I'm a bit of a Papercut Pattern fan was another reason.
Confession: I'm a bit of a queen when it comes to lining, I line everything! Well except for knits and pants that is. I only have one woven dress in my wardrobe that is not lined.
So I always knew that I would have to work out how to line this jacket because the pattern is unlined. I surprised myself in how much I knew to be able to work this out on my own - actually not that difficult! Kat has since written a great tutorial on drafting the lining, which is pretty much what I did, with a couple of variances that really aren't worth mentioning.
I used a stretch satin (for the lining) that I picked up from The Fabric Warehouse to make a slip to go under the wrap dresses I made last year ... yeah, that never happened because I didn't want to wait and just went ahead a bought one :-)
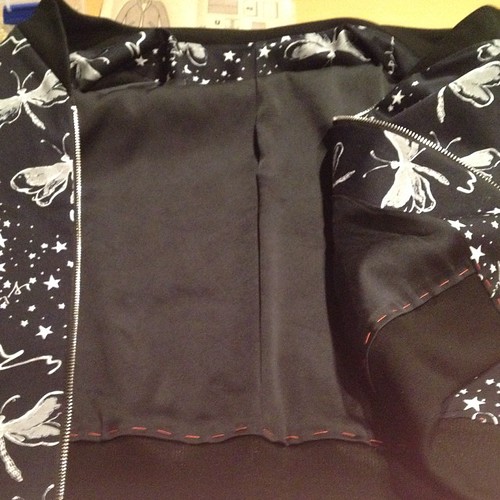
When drafting the lining I decided it would be nice to include a back pleat. I didn't really need to because the jacket has plenty of room and both the lining and shell fabric have lycra content. This was more a 'because I can'.
There really isn't any shaping to this pattern so I didn't bother making a muslin - not even to see if it was broad enough across the shoulders. Because I've sewn a few Papercut Patterns before I just trusted that the sizing would be fine for me - and it was. There is just one thing I wish I had been a bit more diligent about and that is the length of the arms. On most patterns I have to lengthen the arms so you would've thought I would.have.known.better!
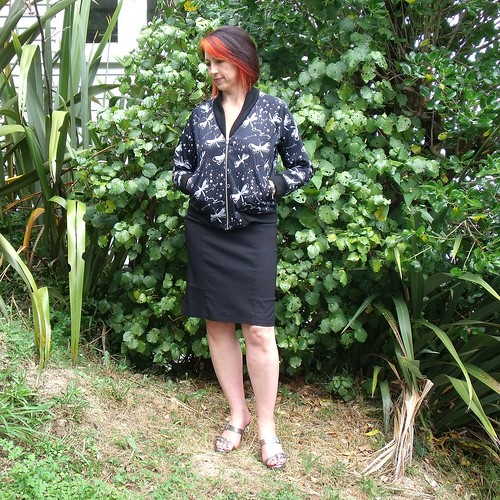
While they don't look terribly bad in these photos, I really wish they were at least another 1" maybe 2" longer.
The only other alteration I made was to trim 1/4" off the bottom of the pocket so it would fit inside the lining.
Oh, inserting the lining I did a little bit differently than the tutorial, cause I hate fluffing around with the machine. I attached the lining to the facing by machine and then stitched the facing in as per the pattern instructions, but then I sewed the bottom of the lining in by hand, as well as the cuffs.
I basted the lining to the jacket so I didn't have to deal with pins and then very carefully used a fell stitch along the stitching line where the band is attached to the shell. I personally love the look of the wee fell stitches.
I really did enjoy making this pattern. It was kinda nice to just follow clearly written instructions (doing as told) with the added challenge of the lining. I really like all the fabrics including the ribbing and the zip is awesome, but I am just not sure that I will wear it??? My jury is still out on that one.
More photos are up on my Flickr -->
One that really caught my eye recently was worn by Gwen Stefani during her time judging on "The Voice", but do you think I can find it anywhere on the net - NO! But what I did start was a inspiration board on Pinterest, if you're looking for something to spark your bomber craze.
After all that inspiration can you believe it, I settled on a black ... but hey it's got silver and white Dragonflies!
About this time last year I made a satin bomber jacket for my daughter using a Burda pattern. While it was relatively easy to put together what I didn't like was that the zipper was sewn directly to the bottom band and when you put ribbing under the machine foot it squishes and stretches.
So when Sonja, Mel and Kat announced Rigel Bomber Jacket January I was keen to sew along and this time make myself a bomber. And that I'm a bit of a Papercut Pattern fan was another reason.
Confession: I'm a bit of a queen when it comes to lining, I line everything! Well except for knits and pants that is. I only have one woven dress in my wardrobe that is not lined.
So I always knew that I would have to work out how to line this jacket because the pattern is unlined. I surprised myself in how much I knew to be able to work this out on my own - actually not that difficult! Kat has since written a great tutorial on drafting the lining, which is pretty much what I did, with a couple of variances that really aren't worth mentioning.
I used a stretch satin (for the lining) that I picked up from The Fabric Warehouse to make a slip to go under the wrap dresses I made last year ... yeah, that never happened because I didn't want to wait and just went ahead a bought one :-)
When drafting the lining I decided it would be nice to include a back pleat. I didn't really need to because the jacket has plenty of room and both the lining and shell fabric have lycra content. This was more a 'because I can'.
There really isn't any shaping to this pattern so I didn't bother making a muslin - not even to see if it was broad enough across the shoulders. Because I've sewn a few Papercut Patterns before I just trusted that the sizing would be fine for me - and it was. There is just one thing I wish I had been a bit more diligent about and that is the length of the arms. On most patterns I have to lengthen the arms so you would've thought I would.have.known.better!
While they don't look terribly bad in these photos, I really wish they were at least another 1" maybe 2" longer.
The only other alteration I made was to trim 1/4" off the bottom of the pocket so it would fit inside the lining.
Oh, inserting the lining I did a little bit differently than the tutorial, cause I hate fluffing around with the machine. I attached the lining to the facing by machine and then stitched the facing in as per the pattern instructions, but then I sewed the bottom of the lining in by hand, as well as the cuffs.
I basted the lining to the jacket so I didn't have to deal with pins and then very carefully used a fell stitch along the stitching line where the band is attached to the shell. I personally love the look of the wee fell stitches.
I really did enjoy making this pattern. It was kinda nice to just follow clearly written instructions (doing as told) with the added challenge of the lining. I really like all the fabrics including the ribbing and the zip is awesome, but I am just not sure that I will wear it??? My jury is still out on that one.
More photos are up on my Flickr -->
Tuesday, 21 January 2014
Satin Summer Bomber
I promise, this is the last post for my 2013 makes! This jacket has been a real journey, and for no real reason. It started back in May 2013 during the Burda sew-along when I was checking out the patterns available on Burda Style. It look me a couple-a months to print and tape together, at the same time I went fabric shopping (yay). But it was September before I cut into the fabric. Once cut it sat simmering away for a few more months before it made it to my sewing table - by this time Papercut Patterns had release their new range which included a bomber jacket. Gee my subconscious must have been telling me something!
This is the Blouson Jacket 02/2013 #125 downloadable from Burda Style and available in sizes 34-42. Designed to sit on the waist with 3/4-sleeves. I stuck to the fabric recommendation and purchased a stretch satin from Global Fabrics (now The Fabric Store) - the touch is soft and dreamy, and falls beautifully. I think I may have been put off by how hard I thought it would be to sew, but it was actually quite stable and went under the machine like a dream.
I couldn't find a blue rib knit that I liked so went with a black for all the bands. I love it because it goes together without actually matching. I lined it with the same fabric, so the jacket can actually be worn either way - the only give away that it is inside-out is the zip. I used a black chunky open ended zipper.
Unfortunately not many fabulous photos of this, as I didn't make it for me, but daughter was refusing to allow me to take photos, preferring to be behind the camera with the same attitude! I'm pleased with the result after months of waiting to make its debut. Daughter is also stoked and wears it all the time.
I would recommend this pattern. It is really easy to sew together with just three pattern pieces plus the ribbing. Putting the zip into the ribbing at the bottom front was the trickiest, because the ribbing wanted to squish under the sewing foot while I was being careful not to sew too close to the zipper teeth. Slowly but surely and it all worked out.
More (not so flash) photos on my Flickr -->
This is the Blouson Jacket 02/2013 #125 downloadable from Burda Style and available in sizes 34-42. Designed to sit on the waist with 3/4-sleeves. I stuck to the fabric recommendation and purchased a stretch satin from Global Fabrics (now The Fabric Store) - the touch is soft and dreamy, and falls beautifully. I think I may have been put off by how hard I thought it would be to sew, but it was actually quite stable and went under the machine like a dream.
I couldn't find a blue rib knit that I liked so went with a black for all the bands. I love it because it goes together without actually matching. I lined it with the same fabric, so the jacket can actually be worn either way - the only give away that it is inside-out is the zip. I used a black chunky open ended zipper.
Unfortunately not many fabulous photos of this, as I didn't make it for me, but daughter was refusing to allow me to take photos, preferring to be behind the camera with the same attitude! I'm pleased with the result after months of waiting to make its debut. Daughter is also stoked and wears it all the time.
I would recommend this pattern. It is really easy to sew together with just three pattern pieces plus the ribbing. Putting the zip into the ribbing at the bottom front was the trickiest, because the ribbing wanted to squish under the sewing foot while I was being careful not to sew too close to the zipper teeth. Slowly but surely and it all worked out.
More (not so flash) photos on my Flickr -->
Subscribe to:
Posts (Atom)