Sunday, 22 June 2014

Marfy Shift Dress

My discovery of Marfy patterns led me to the purchase their latest catalogue, which also comes with 20 free patterns.  I figured that 20 free patterns made it well worth the investment and shipping from Italy.

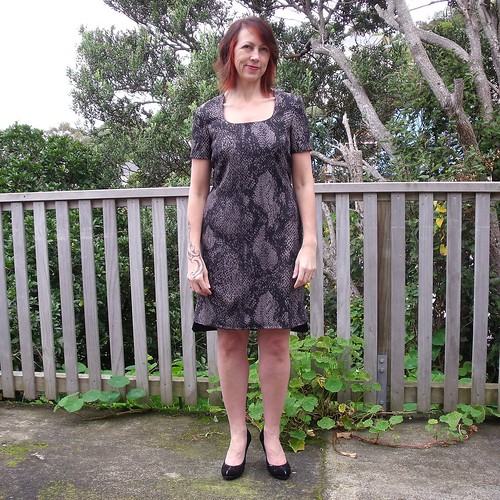
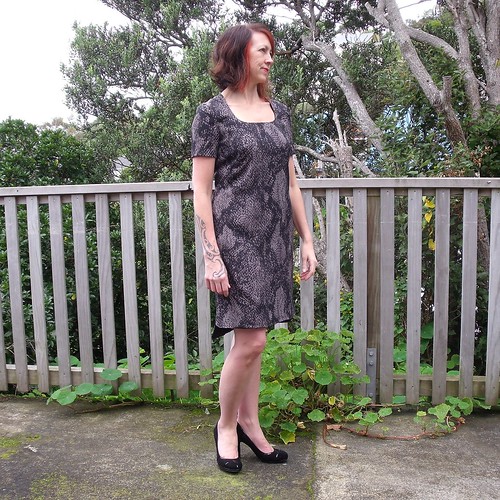
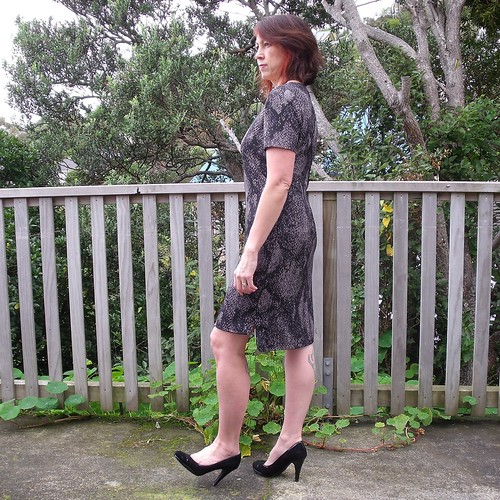
I thought I would start with a nice simple shift dress.  I took a fancy to the uneven hemline with slightly curved corners, matched with a square but curved neckline.  The side darts add waist definition as well as room for the bust.

Untitled

I made a couple of adjustments to the muslin:
  • added 3/4" above the dart but below the armhole to provide for my low bust; 
  • removed 3/4" front the length of the skirt to provided for the amount added above the bust; and 
  • added 1/4" to the front and back side seams from the waist down.

Untitled

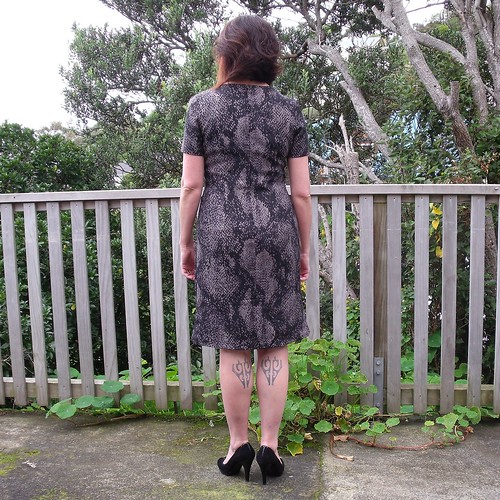
The back has two darts to give the dress a snug fitted look through the waist.  I inserted a 55cm lap zipper by hand, using a pick stitch.  I love that you can barely tell that there's a zip there :-)

Untitled

I purchased this really cool snake skin print from the Arthur Toye closing down sale for just $5 per metre - it's a polyester crepe (I think), with a really nice fall.

The fabric needed more body, so as not to stick to me with a little static, but rather skim over my body and fall uninterrupted, so I interlined it with silk organza and then lined it with a cotton viole.  The pattern doesn't provide for any facings but not necessary when it is fully lined.  I inserted the lining by hand with a wee fell stitch.

Untitled

What I have discovered is that this isn't a dress that I can wear in the winter, because the cotton viole and stockings just don't go together!

While this is my second Marfy make (my first here), this is the first one I've made solo.  It was relatively straight forward and I'm happy with the final result - instructions are over rated!!!

More photos on my Flickr -->


Sunday, 8 June 2014

Mission Maxi Hack

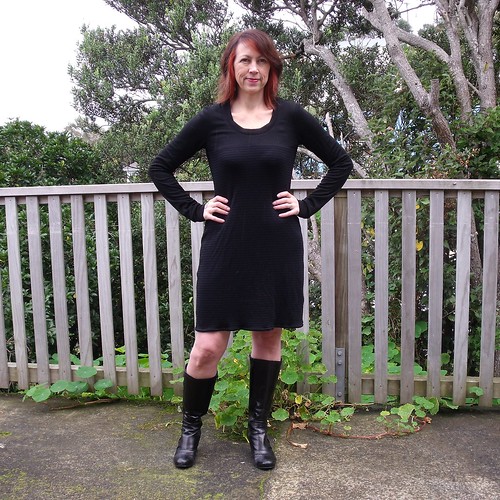
The month of May was not only Me-Made-May but it was also Sew Stretchy over at The Monthly Stitch.

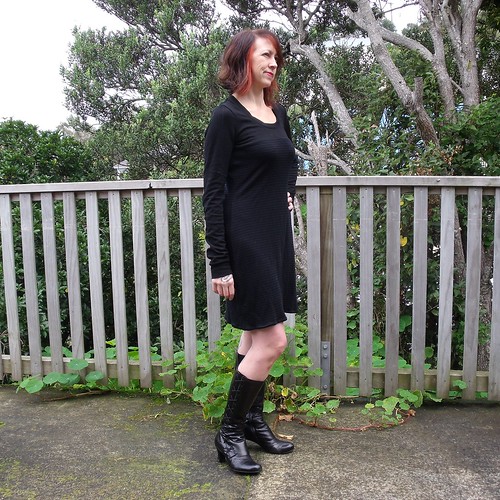
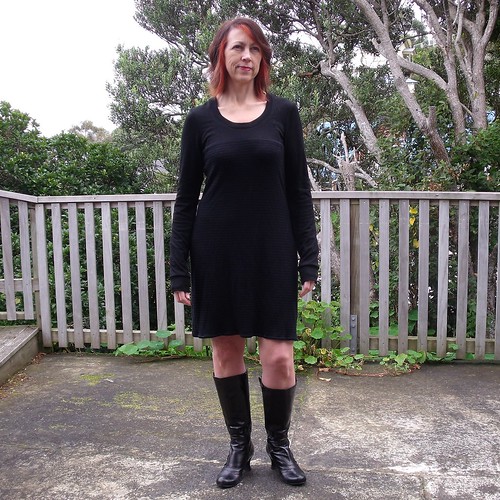
The idea of a nice warm knit dress for winter has been brewing away in the back of my mind for a little while - but not anything as simple as finding a pattern and getting to work.  No, no, no!  This was a long-sleeve t-shirt dress which was a combination of the Mission Maxi by Jamie Christine, a Renfrew for the scoop neck (so I didn't have to calculate the neck band) and contrasting of the Ensis Tee.  Now put that on boil and stir occasionally.

Mission Maxi Hack


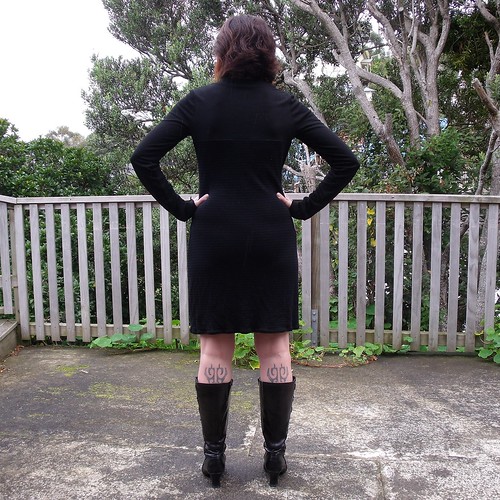
I'm feeling okay about the finished result.  I've worn it a couple of times and usually with a pair of black stockings, but today it's bare legs for these photos - sorry legs might be a bit bright, they haven't seen the light of day for a couple of months now, it being winter 'n all.

The dress is beautifully warm with the body made from a snuggly soft thin striped merino from The Fabric Store, the top bodice and sleeve from a ponte jersey knit.  It's loose fitting and very forgiving, but with a bit of shape so it doesn't hang like a sack.

Mission Maxi Hack

A couple of things that need addressing before making another ... the sleeves are just too long.  I added 1/2" to the Renfrew pattern - well that's what I wrote on my notes, but it looks as if I added 1.5".  While the sleeves can double as hand warmers, they are just too long :(

Mission Maxi Hack

Really, just look at those sleeves!  I suppose I could just cut off the cuff and reattach.  Hmmmm I just might do that.

I'm not too sure about the shoulder width either.  I made another Renfrew, that I haven't blogged yet, and after making that one I decided that the shoulder width of this dress could afford to be wider, so I added 1/4" to the shoulder seam using the cut a spread method, but I think I could have been a little more conservative and just added 1/8".

Mission Maxi Hack

The underarm side seam could also have some fabric removed, but I'm still trying to work out in my head how I might do that without actually reducing the armseye and making the upper sleeve too tight.  I've got this dilemma with pretty much everything with sleeves.

This is a very easy dress to wear and it is great for wearing to work when I've got a day of desk bound things to do (and I feel like eating good warm hearty winter food!)

Not many photos as it started to shower just as I got outside with the camera.
A few more photos on my Flickr -->

Sunday, 11 May 2014

Moss Mini - for the fun of it!

Back in February when the weather was still warm, I thought I needed an easy to wear skirt for the weekends rather than just going for shorts all the time.  I came across the Grainline Studio Moss Mini while stalking the Flickr Group.  The measurements where perfect for my body shape, so immediately clicked the buy button and downloaded the PDF pattern!

Moss Mini Muslin

I didn't want to bother making a muslin, so though I would use fabric recently left over from my Wolfies (stretch cotton twill) and Brasilia Dress (cotton sateen stretch) to make a wearable muslin.  Here is what I got with only one minor adjustment to the length.

Moss Mini Muslin

I added 1" to the length of the skirt, at the recommended place on the pattern. 

Moss Mini Muslin

Whilst the skirt is comfy it could hug my waist a little more.  I think I could easily remove 1/4" from the centre front pattern piece to reduce the total circumference of the skirt by 1/2" just at the waist.  I also used the skirt fabric to for the fly lining, which has made the fly a bit bulkier than desired.  Note to self for next time - use a stiff interfacing!

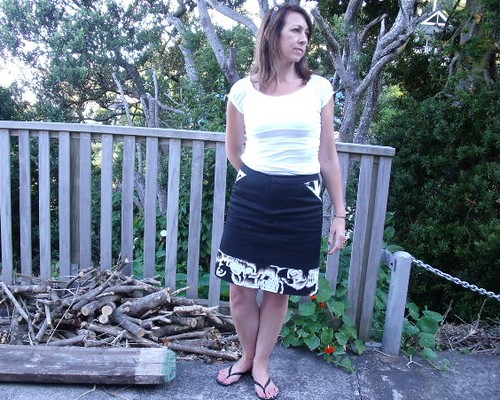
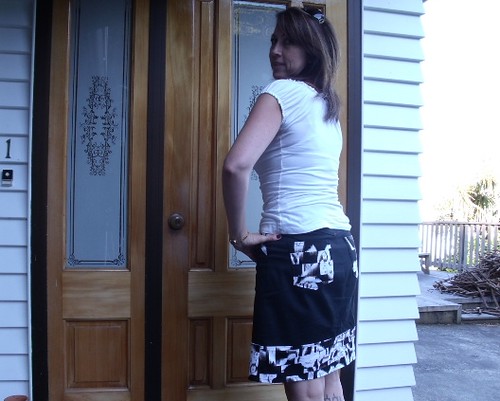
The back of the skirt is a good fit.  For a bit of interest I added some patch pockets from my jeans pattern.

Moss Mini Muslin

I really like the back yoke of the skirt - it's got a real 'jean' feel to it.  I have a nice piece of denim in my stash and just might have to make a jean version - perhaps lined for winter so I can wear stockings without it clinging.

A really great little pattern that I can see replacing my shorts in the summer.

More photos on my Flickr -->


Thursday, 1 May 2014

Me-Made-May 2014

me-made-may'14


I, Sandra of www.sewiststitch.blogspot.co.nz/, sign up as a participant of Me-Made-May '14.  I endeavour to wear at least one item of me made for each day for the duration of May 2014.

I learnt about this challenge completely by chance last year, when my feed reader was full of people talking about wearing their own makes during the month of May.   It is such a great challenge to celebrate your own handmade wardrobe.  You can read more about the Me-Made-May Challenge over at So Zo.

This is my second year of ready to wear fasting, and my wardrobe has been growing steadily, although there is still at least 1-2 days per week where I won't wear something me made.  I don't consciously make a decision to wear or not to wear me-made, its more about what goes together on the day.  So this May I am going to make a conscious effort to wear one item of me-made per day and identify what items in my wardrobe need building.  I suspect it is more casual wear for the weekends and tops but let the month of May tell the true story.

I can't promise to do a daily photo diary but any attempts will be posted to Instagram.

Happy Month of May :-)

Saturday, 5 April 2014

Marfy Free Jacket Pattern - Part 1

This is the garment that I've been most looking forward to, the Marfy Jacket 1756 - one of the three free patterns made available this year.

I began by selecting a size 46.  Traced the pattern and cut my muslin.  Now here's were it get's interesting as there are no construction instructions.  The only thing that you have to go on is the artist impression and markings on the pattern pieces.


I started by sewing up the centre back seam and then attached the side back pieces to give me a complete back - easy!

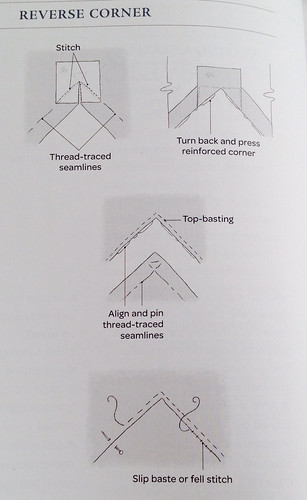
Then I thought, attach side front to centre front.  This would be straight forward if they were princess seams, but not!  The side front is an inset corner ... I've only ever sewn one of these before on my Mila Dress, and while it worked out okay, it was a bit of hit and miss.  I went to the trusty internet looking for a technique, this is what I found - Shirley Smith is a goddess!


This is so easy and the end result is, OMG, perfection! There is also a wee section in the book "Couture Sewing Techniques" by Claire Shaeffer on seams with reverse corners.  This is a very similar technique to that demonstrated by Shirley in the video but using hand stitches instead of machine stitching.

Reverse corner technique

Next, I sewed the shoulder seams, then the centre back of the collar before attaching that to the back - tricky little corners, and actually I might try the above technique on those corners as well. I sewed the centre back collar of the front facing then pinned and sewed the front lining to the jacket in one continuous sewing line.

I learnt a good tip from Stephanie Lincecum ... about sewing in the corner of collars to avoid the 'blow-out' ... stop about one stitch before the corner, place the foot at a 45 degree angle to the line of stitching just sewn, sew one or two stitches, turn again to sew the next  seam.  It's the little things that matter!

Finish muslin, deciding length
Make-up free face of concentration!!
I'm pretty happy with the final muslin fit - it only took me 5 weeks!  The first muslin fit was too big around my body, but shoulder width and waist location all seemed to be okay, so I tore the first muslin apart and reduced all vertical seams down to a size 44.  There is room to move and enough room to wear some winter layers of clothing underneath. 

I was surprised at how long the jacket is given the description of the pattern reads "This short, tight-fitting jacket closes edge-to-edge with hooks".  I've removed 3inches from the length so it will sit on my high hip.

Now I need to think about the construction of the actual jacket.  I think it might be a combination of a tailored blazer and a french jacket.  Thinking, thinking ....


Friday, 21 March 2014

HELP! Sewing v Bloglovin Conundrum

Work and life has just stepped up a gear now that the honeymoon with the new year is now over.   Because I own my own business work takes first priority after ensuring kids and husband are all organised and loved.  Which means time for things such as sewing take a back seat :-(

But now I've got a conundrum of what to do with the little time I do have and a Friday evening is most definitely still my wind down time - for the past two weeks I've been so exhausted it's been blob in front of the TV kinda evening.

This week I have a little more energy despite already working some long days this week.  But what do to - shall I spend a little time trying to finish my muslin for my Marfy jacket sew-along (that I am so far behind with) or should I spend some time reading my 500+ Bloglovin feed, and show some lovin to the sewing community that gives me so much inspiration and encouragement.

Sew Along  v.s  Follow on Bloglovin

On top of this, I have three blog posts that I can be writing and comments on the existing post that I need to reply (which I will do in a moment).

How do you decide?  What do you do? Please help, Please ....

Okay for now I might just procrastinate a bit more and go watch some TV!

Saturday, 8 March 2014

Wolfies on the Longside

This was going to be my Project Sewn entry for the shoe inspiration challenge - but life got in the way and I didn't get photos taken and edited in time to add the link.

Snake Skinny Wolfies

The shoes are Mia Piaci that I got on my last trip to Auckland.  You may have seen them on my Instagram feed!  I totally love them.  Let me show you a close up ...

Snake Skinny Wolfies

These shoes look best with a skinny jean/pant, so I decided it was time for a couple of pattern hacks, ha-ha-ha!

The pants are Peter and the Wolf by Papercut patterns.  I made my first pair of Wolfies in December, you can read about my first dance with this pattern here.

The first pair was made straight out of the box.  The fit needed some small tweaks to move fabric from the front to the back, but the bones of the pattern were good.   I needed to add some depth to the back and remove some length from the front in the high hip and waist region.

For the second pair I picked up some heavy black cotton sateen and snake skin print from the Arthur Toye closing down sale.

Snake Skinny Wolfies

I'm not a huge fan of the 3/4 leg pant, so this time I wanted to convert the pattern to a skinny fit.  Changes to the pattern included:
  • removing 1/4" from about the centre of the front crouch seam, by creating a hinge.  I dropped the crouch at the inner leg seam by 1/4" to put back the same amount of fabric I had taken out.
  • I lowered the centre front by 3/4" and the front leg seam by 1/2" tapering up to the original height of the side seam.
  • I added 1/2" to the centre back seam, about 2" below the top edge.
  • I added 6" to the length and tappered all four pieces so the circumference around my ankle was 9" in total.
  • Added 5" to the waist band because the pants now sit on my hip rather than my waist.
  • Added belt loops.
The major change I made to the pant was to insert a front fly rather than having a side seam.  I copied the fly front and pattern pieces from my favourite Jalie jean pattern.  This is the best fly front that I have ever done, although it is only my third!

Snake Skinny Wolfies

I also attempted to put in some faux pocket openings in the back, copying a concept from one of my ready to wear jeans.  This was a bit of a fail!  They look okay from a distance and give the look I was trying to achieve but don't look to closely at them, cause they aren't pretty.

Snake Skinny Wolfies

For the leg hem I used a self-drafted facing and included a small side split.  I'm really liking the hem facing concept, it gives a really nice crisp line.  I used a bit of contrast fabric for the front facing, just cause I could :-)

Snake Skinny Wolfies

I made an Ensis tee (pattern hack) to wear with these pants.  After my other recent Ensis Tee, I wanted to play a bit more with the lace concept.  This time I selected a black merino and some left over stretch lace from this dress.  I hacked this pattern quite severly ...
  • For the top pieces and sleeves I cut a XS - the fit of my previous tees where perfect.
  • The body needed to be a closer fit, so I cut the bottom body pieces down to a size XXS.
  • I had to reduce the upper body pieces under the arm to a size XXS, which now means my sleeves wouldn't fit, so I added the extra 5/8" back into the armseye by lengthening the top body pieces under the notches.
  • I dropped the neckline by 2"
  • The bottom body pieces were shortened to the waist so I could add a peplum.
  • I decided to take the peplum from the Cake Hummingbird pattern
Lace Ensis Peplum

I had a slight hiccup in that I didn't quite have enough of the merino that I got from The Fabric Store and had to use some that I just purchased from Arthur Toye.  They are slightly different in quality and colour - not that I think anyone but me will notice.

I'm not that in love with this tee.  I didn't allow any fabric for the bust so the seam at the front waist is higher than the back.  I kinda wish I had made it without the peplum.  I have more merino and more of the lace so I might just do that yet.

More photos on my Flickr --> I used a different camera for these resulting in smaller images than usual.  I must work out the setting, or get another camera!