I began by selecting a size 46. Traced the pattern and cut my muslin. Now here's were it get's interesting as there are no construction instructions. The only thing that you have to go on is the artist impression and markings on the pattern pieces.

I started by sewing up the centre back seam and then attached the side back pieces to give me a complete back - easy!
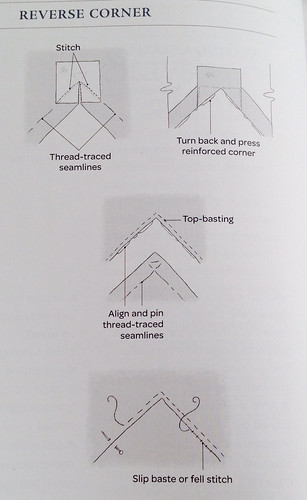
Then I thought, attach side front to centre front. This would be straight forward if they were princess seams, but not! The side front is an inset corner ... I've only ever sewn one of these before on my Mila Dress, and while it worked out okay, it was a bit of hit and miss. I went to the trusty internet looking for a technique, this is what I found - Shirley Smith is a goddess!
This is so easy and the end result is, OMG, perfection! There is also a wee section in the book "Couture Sewing Techniques" by Claire Shaeffer on seams with reverse corners. This is a very similar technique to that demonstrated by Shirley in the video but using hand stitches instead of machine stitching.
Next, I sewed the shoulder seams, then the centre back of the collar before attaching that to the back - tricky little corners, and actually I might try the above technique on those corners as well. I sewed the centre back collar of the front facing then pinned and sewed the front lining to the jacket in one continuous sewing line.
I learnt a good tip from Stephanie Lincecum ... about sewing in the corner of collars to avoid the 'blow-out' ... stop about one stitch before the corner, place the foot at a 45 degree angle to the line of stitching just sewn, sew one or two stitches, turn again to sew the next seam. It's the little things that matter!
 |
| Make-up free face of concentration!! |
I was surprised at how long the jacket is given the description of the pattern reads "This short, tight-fitting jacket closes edge-to-edge with hooks". I've removed 3inches from the length so it will sit on my high hip.
Now I need to think about the construction of the actual jacket. I think it might be a combination of a tailored blazer and a french jacket. Thinking, thinking ....