Tuesday 27 January 2015

Rigel Bomber Jacket January ft Dragonflies

When it comes to a bomber jacket no longer is it the stereo type of two toned solid colour with a stripe in the cuff, which may have been the 'in thing' when I was back in High School!  Skip a few decades and the bomber jacket is still popular but the variety is far from stereo type.

One that really caught my eye recently was worn by Gwen Stefani during her time judging on "The Voice", but do you think I can find it anywhere on the net - NO!  But what I did start was a inspiration board on Pinterest, if you're looking for something to spark your bomber craze.

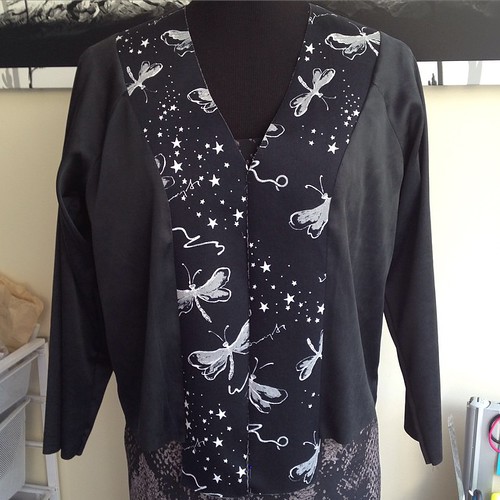
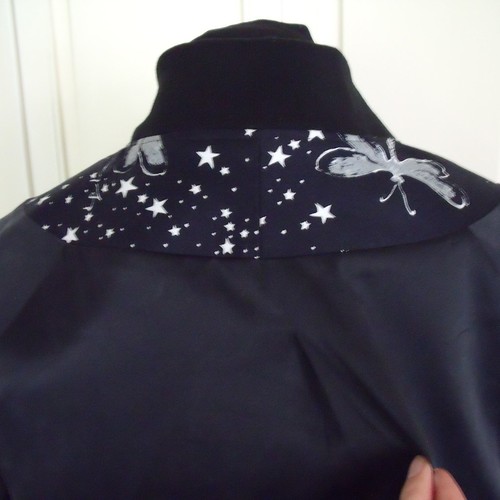
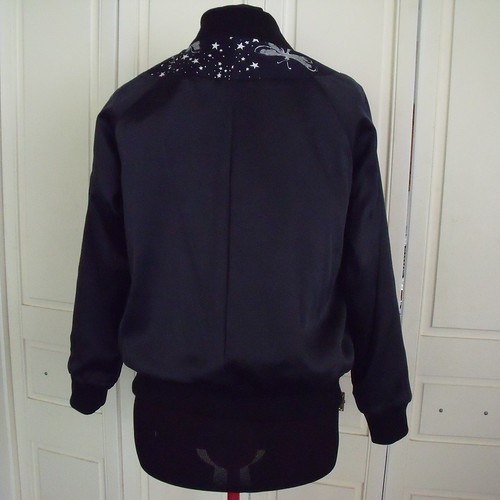
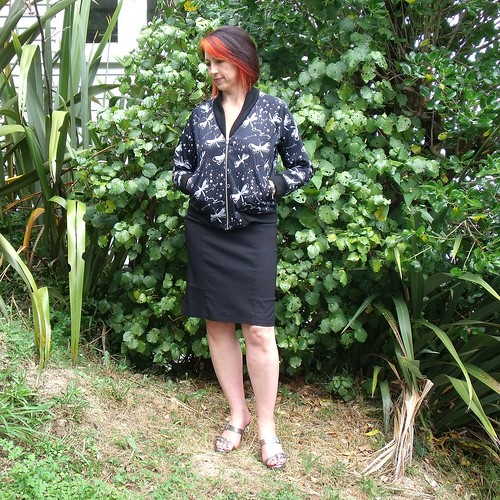
After all that inspiration can you believe it, I settled on a black ... but hey it's got silver and white Dragonflies!

Dragonfly Rigel Bomber

About this time last year I made a satin bomber jacket for my daughter using a Burda pattern.  While it was relatively easy to put together what I didn't like was that the zipper was sewn directly to the bottom band and when you put ribbing under the machine foot it squishes and stretches.

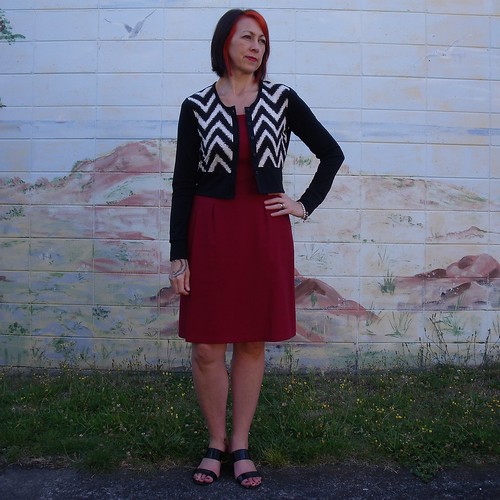
So when Sonja, Mel and Kat announced Rigel Bomber Jacket January I was keen to sew along and this time make myself a bomber.  And that I'm a bit of a Papercut Pattern fan was another reason.

Confession: I'm a bit of a queen when it comes to lining, I line everything!  Well except for knits and pants that is.  I only have one woven dress in my wardrobe that is not lined. 

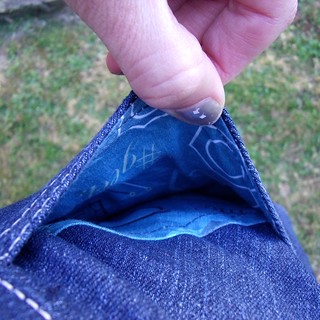
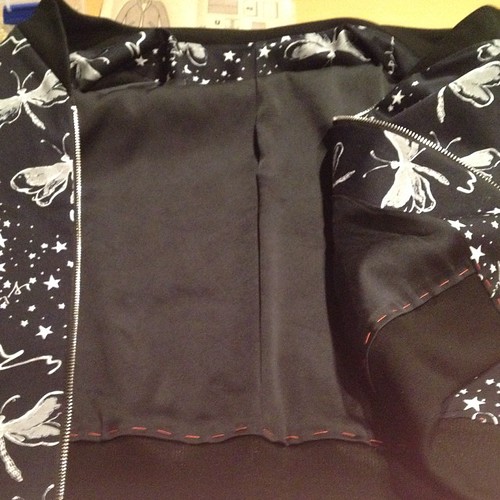
So I always knew that I would have to work out how to line this jacket because the pattern is unlined.  I surprised myself in how much I knew to be able to work this out on my own - actually not that difficult!  Kat has since written a great tutorial on drafting the lining, which is pretty much what I did, with a couple of variances that really aren't worth mentioning.

Feeling pretty impressed with myself - successfully drafted a lining and attached it to the facing 🌟 #rigelbomberjanuary #papercutpatterns #sewcialist

I used a stretch satin (for the lining) that I picked up from The Fabric Warehouse to make a slip to go under the wrap dresses I made last year ... yeah, that never happened because I didn't want to wait and just went ahead a bought one :-)

When drafting the lining I decided it would be nice to include a back pleat.  I didn't really need to because the jacket has plenty of room and both the lining and shell fabric have lycra content.  This was more a 'because I can'.

Dragonfly Rigel Bomber Dragonfly Rigel Bomber

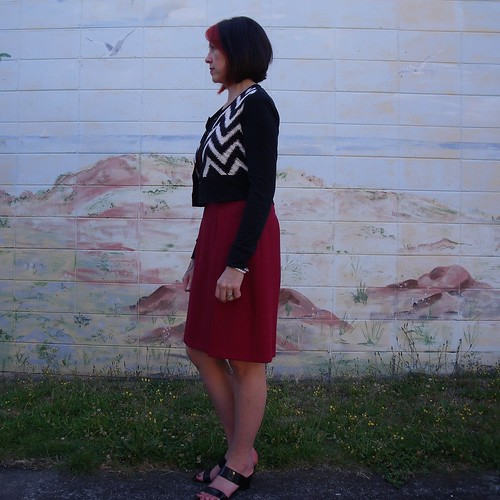
There really isn't any shaping to this pattern so I didn't bother making a muslin - not even to see if it was broad enough across the shoulders.  Because I've sewn a few Papercut Patterns before I just trusted that the sizing would be fine for me - and it was.  There is just one thing I wish I had been a bit more diligent about and that is the length of the arms.  On most patterns I have to lengthen the arms so you would've thought I would.have.known.better!

Dragonfly Rigel Bomber

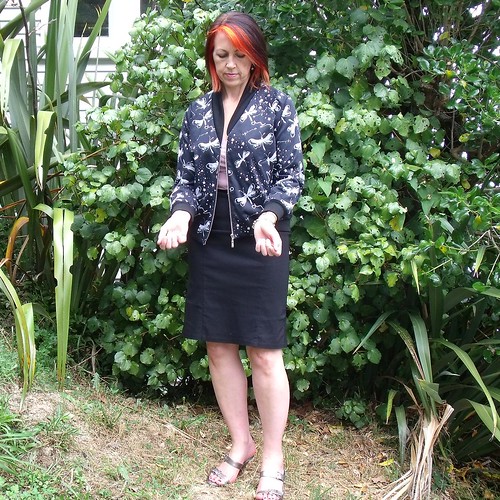
While they don't look terribly bad in these photos, I really wish they were at least another 1" maybe 2" longer.

The only other alteration I made was to trim 1/4" off the bottom of the pocket so it would fit inside the lining.

Oh, inserting the lining I did a little bit differently than the tutorial, cause I hate fluffing around with the machine.  I attached the lining to the facing by machine and then stitched the facing in as per the pattern instructions, but then I sewed the bottom of the lining in by hand, as well as the cuffs. 

Lining basted in coz I prefer to hand stitch it down #rigelbomberjanuary #papercutpatterns #sewcialist
I basted the lining to the jacket so I didn't have to deal with pins and then very carefully used a fell stitch along the stitching line where the band is attached to the shell.  I personally love the look of the wee fell stitches.

Dragonfly Rigel Bomber

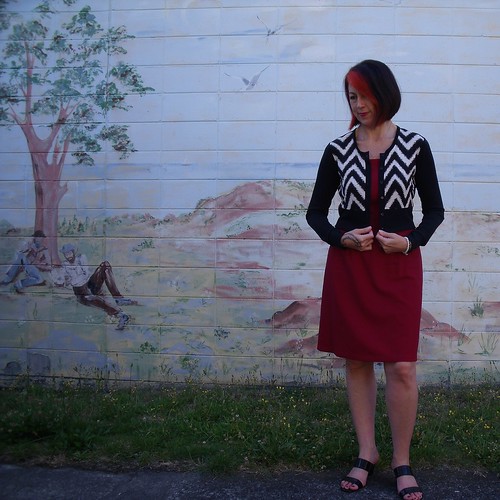
I really did enjoy making this pattern.  It was kinda nice to just follow clearly written instructions (doing as told) with the added challenge of the lining.  I really like all the fabrics including the ribbing and the zip is awesome, but I am just not sure that I will wear it???  My jury is still out on that one.

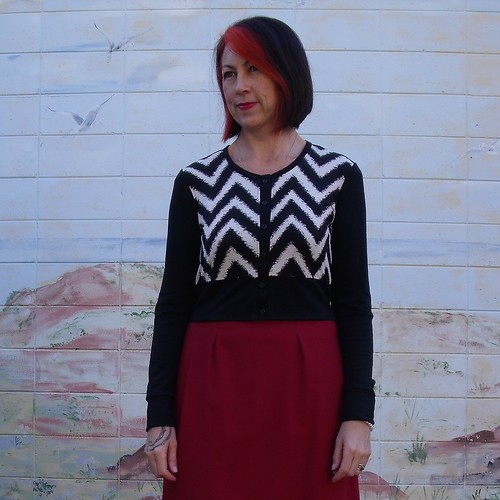
More photos are up on my Flickr -->


Sunday 25 January 2015

Wonders happen overnight ... sometimes!

I must say that I've never done this before ... cut and sewn a new garment, literally overnight! (no sewing fairies were available during the making of this edition, due to holidays)

So I might have made a new #JennaCardi after work today - just coz #stashbusting #sewcialist

I think it was Wednesday evening, when I arrived home from work I was at a bit of a loss ... I didn't have to cook dinner and kids were all taken care of, so that just left me and my sewing corner :-) But I couldn't carry on with my current labour of love (B5882) because it needed a fitting and the body needed for said fitting wasn't home.  What to do???  Pull out a quick and easy project on the to do list, of course!

This is the Jenna Cardi that I first made back in September and have worn endlessly ever since. The cropped version with long sleeves is spot on for me.

Chevron Jenna


It sits bang on my waist and is perfect for wearing with just about everything in my wardrobe, but it works well with a dress.

Chevron Jenna

I hadn't transferred any of the adjustments from my first cardi over to the pattern, so first things first I made the following changes to the original size 36 I'd traced off:
  • shaved 1/4" off the shoulder seam, at the sleeve edge, blending into the curve of the armscye about half way down.
  • removed 1" from the length of the sleeve
  • added 1" to the length of the sleeve cuff - just cause I prefer a deep cuff.
  • removed 1" from the sleeve cuff pattern piece, reducing the circumference of the cuff by 2".
  • removed 1" from each side of the sleeve hem, tapering to zero about 2" below the underarm, providing me with a more fitting sleeve - again personal preference.

Chevron Jenna

The fabric was maturing in the cupboard... the sold black is merino (not the best btw) that I picked up from the Arthur Toye closing down sale for $15 p/m.  At the time I thought it was a bargain, but when I got it home to discover that it was all off grain and with a few flaws, well it then wasn't such a bargain!

I ignored the selvage matching and just tried to lay the fabric out on-grain as much as I could.  That seemed to work pretty well because it doesn't feel 'all wiggly' when I wear it.

The chevron is a poly knit that I previously used to make an Ensis Tee (that I don't wear that often because the cuffs are too tight and I can't be assed fixing them).

Chevron Jenna

The chevrons!!!  I cut both front pieces on a single layer so I could match the chevrons exactly where I wanted - and I'm pretty darn happy with dem chevrons :-)  I'm pretty much floating away on the happy matching cloud right now!

I'll leave you with more photos on my Flickr while I revel in this happy sewing high...


Monday 19 January 2015

Summer is for Maxi Dresses

It's no secret that I'm a sucker for a maxi dress ... so when Named Clothing released their latest collection 'Ritual' the Ama Cowl Neck Frock was immediately on my MUST HAVE list.

Ama Cowl Frock

I'm not a fan of an elastic waist band but the back of the dress bodice is 'killer'!  I've not seen this before in any other pattern, so the uniqueness of the design was also a big attraction for me.

Ama Cowl Frock
Ignore the bra straps that poke out from the top - they are not part of the frock!

What I didn't realise, well actually I didn't read the outline of the pattern correctly and missed that it said "Wear with the Shadi Knit Skirt", which was the indication that the skirt wasn't lined.  That would be why I couldn't find the skirt lining pieces in the box! I just assumed that it was because you just use the skirt pattern pieces for the lining as well - normal right :-)

I traced off the two skirt pieces and shortened so the lining would come just above my knee.

Ama Cowl Frock

But when I got to the instructions on attaching the bodice to the skirt I was really confused on how the casing for the elastic was created and that is because I had an extra piece of skirt lining fabric that the instructions didn't. Now the penny drops!

Anyway, fudging it included attaching the skirts to the outside layer of the bodice leaving the bottom of the bodice lining unattached.  I then folded the bodice lining seam allowance under and attached that by sewing in the ditch on the seam I just created sewing the bodice to the skirt.  I then sewed another row of stitching above that, into both layers of the bodice for the elastic casing. Gee I hope that makes sense!  All fudging is covered by a belt anyway :-)

I didn't do a muslin for this dress.  I figured that it wasn't too fitted and I could get away with fitting as I went.  Named Clothing design for a tall woman, so knowing this I didn't have to make any alterations to the length of the bodice or the skirt.  It is the perfect length when I wear with flats - I would probably only wear it with flats.

Ama Cowl Frock

I did alter the width of the hem of the skirt, reducing both the front and back by 7", making a total of 14" from the circumference of the hem.  The pattern suggests leaving the side seams open all the way to the waist if wearing a skirt underneath, but I thought that would be really weird if caught in a gust of wind (not unusual for Wellington), so I sewed the side seams closed 18" down from the waist - about in line with the lining.

Ama Cowl Frock

The shell of the dress is a poly/tencil/viscoe that I picked up from the Fabric Warehouse pop-up sale in September 2013 for just $3 per meter.  It was a breeze to sew and it's lovely to wear. The drape of the fabric is perfect for the soft cowl of the Ama.

Ama Cowl Frock

This is a really lovely dress that is super easy to wear.  I would consider making another one, shorter (to the knee), to wear to the beach.  It would be so easy to throw over the swimwear.

More photos on my Flickr -->


Sunday 11 January 2015

Denim skirts never get old

Denim Moss Mini

The denim mini skirt never dies! Although believe it or not, this is the first denim skirt that I've ever owned, but it's never too late, right!

Why now then? Two reasons: 1. the monthly stitch challenge for January is "denim never dies" and 2. I previously made the Moss Mini which was a perfect fit straight out of the packet - gotta love that!

I have major jean making plans, with three jean patterns lined up in an effort to find the perfect pattern for me. Trying to find appropriate weight denim with a 2% lycra content in a colour that I like is a bit of a mission, even with all the fabric shops in Wellington! All three of the patterns call for a small lycra content, which I'm happy with cause they aren't so restricting.

About mid December I stopped into Spotlight on my way passed (I'm not even sure what I went there for) but while cuing to get to the counter I was standing in front of the denim, so of course had to check them all out.  What do ya know - this decent weight, dark denim with 2% lycra was just sitting there waiting for me... and only $10 p/m, bargain! I didn't buy just one metre, oh no I bought 8 metres!  That would allow me to make three pair of, wearable muslin, jeans with some to spare.

A denim Moss Mini was the perfect, quick make, to test how it sews up.

Denim Moss Mini

I also wanted to try distressing the denim to give it a worn look, and see how that would work. So it wasn't that I actually wanted a denim skirt, I thought I would start small with something that was tried and true to test out the fabric with some sand paper and different colour top stitching. Maybe I should call this my test everything skirt!

I went to Bunnings (hardware store) and picked up a 150grit 'sanding sponge', yes it is exactly what you are thinking, a sponge with sand paper on the outside, similar to this one on Amazon.

I took it easy on the distressing - didn't want to put a hole in the fabric first time. The front is probably the most obvious.

Denim Moss Mini

I also distress the front pocket facing, the back pockets, the seam allowances after folding them over but before top stitching. All distressing is done before applying the topstitching.

Denim Moss Mini

The Moss Mini doesn't have back pockets, but a person (moi) with no butt needs to add detail in this area. This time I took the back pockets from the Ginger Jeans, I'm lovin the shape of these pockets, top stitched slightly down from the pocket top and added bar tacks to the corners.


Denim Moss Mini

'Cause you have to have a bit of a 'fun factor' I used some scrap fabric for the pocket lining and fly facing :-) This is the Geektastic Spoonflower fabric I made this dress with.

Denim Moss Mini Denim Moss Mini

This skirt is so comfy and easy to wear. I'm gonna call my distressing a win and have already bought more of the grey top stitching thread for the first pair of jeans.

More photos on my Flickr -->

Friday 2 January 2015

The perfect summer cardi

I had so many good intentions to get all my 2014 makes, posted in 2014 ... but here I am on the evening of the second day in 2015 and I have five posts backed up :-(  Oh and today I finished my first make of the new year, which increases the count to six!  Let's get a wiggle on then ...

The Jenna Cardi: the first pattern released by Muse Patterns (a very talented local Wellington designer).  I didn't pick this pattern up until the end of September, when I was looking at a light but warm cardi that would see me through spring into summer. 

Jenna Merino Cardi

I picked up 1 metre of this orange NZ Merino from The Fabric Store earlier in the year for some specific purpose which I now can't remember (hehehe).  It was perfect for the Jenna Cardi, as I can't tell you how many times I've worn this since putting buttons on in late October.  It just goes with everything in my wardrobe, from casual weekend jeans to work dress.


Jenna Merino Cardi

I sewed up a size 36, variation A with long sleeves.  I made this up exactly to the pattern except for the sleeve cuffs where I added 1" to the length/depth - because I like a deep cuff and I have long arms.  After finishing it up the cuffs where way toooo baggy and luckily too long (what, that never happens!).

I fixed this by cutting off the cuffs cleanly around the seam line.  I then reduced the width of the cuff by 2" and reduced the width of the sleeve hem by 2" tapering to zero about 2" below the armhole.  They are now loose fitting but feel more to my liking.

I shuddered when I saw how many button holes where on this cardi.  My Janome has an automatic one step button hole and I haven't mastered it's idiosyncrasies yet, although I have a feeling that I never will.  I did a couple of test button holes on scrap fabric, exactly the same fabric layers, and they worked out fine, so off I set doing the band.  Three out of six were perfect.  The other three were unpicked and redone, and unpicked and then partially manually done - I HATE buttonholes!!!  I wish this machine had a three step process like my last machine.

Jenna Merino Cardi

I had seen a few Jenna Cardis where the shoulder seam was too long and hung down the arm rather than sitting on the shoulder.  Luckily I have a broad back and wide shoulders, but next time I will be tempted to reduce the shoulder seam by about 1/4" to bring it up just slightly.  I might also look at putting domes on the next one instead of fighting with my machine buttonholes again.

Sorry about the over exposed photos - I think this is a combinations of the sunlight, wearing a white striped t-shirt which over exposes the pictures or just a useless camera! Anyway, if I wait until I can get better photos I will never get anything to the blog.