It's been a little quiet around the blog lately, but it's not that I haven't been sewing ... it's that I've been really really bad at taking photos. Come the weekend and I really can't be bothered doing my hair or my face or going outside, because it is sooo cold!
With my hair freshly done, today was the day to get in front of the camera. I'll start with a couple of wearable muslin ... the Belcarra top by Sewaholic and the Elle Pant by Style Arc.
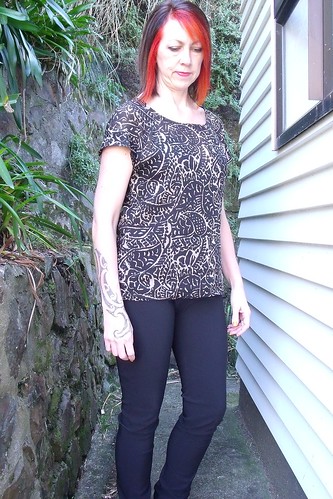
Let's start with the Belcarra. As soon as this pattern hit the world I knew I had to order it - I knew that this is one of those patterns that would be a staple in my wardrobe.
My body shape doesn't fit the Sewaholic profile, so I selected a size 10 based on my bust size and graded to a size 8 at the hips.
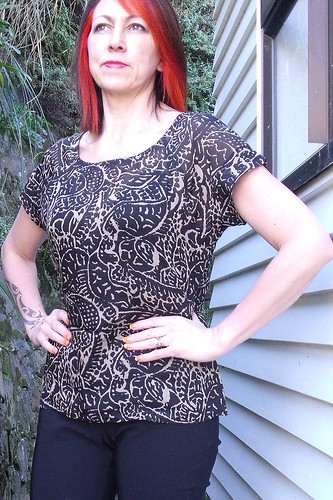
Overall I think it's a damn fine fit. I just wonder whether I need to remove a small amount of fabric to take into account my hollow upper chest, or whether it's meant to be a really relaxed fit? I might ponder on that a little more.
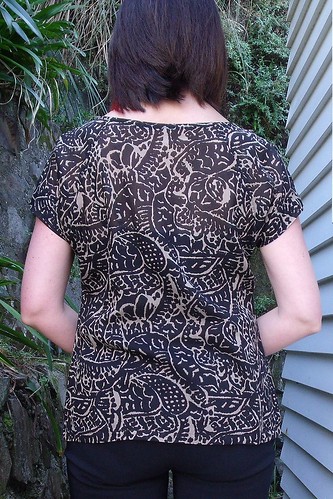
I whipped this up using a 1m of cotton voile that I picked up from the remnant bin at The Fabric Warehouse for just $5.00. Because I only had one metre of fabric I had to use black bias binding for the neck binding. I made my own bias binding, that worked a treat.
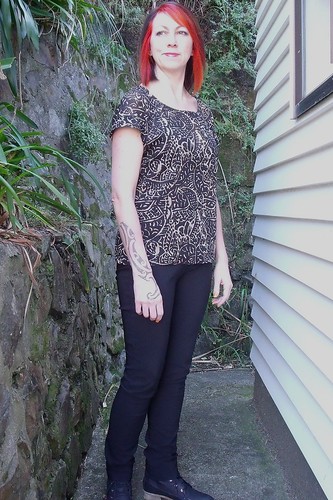
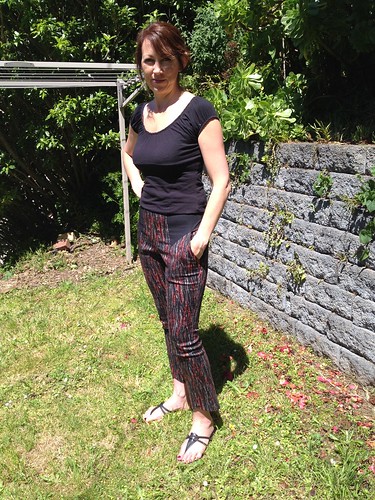
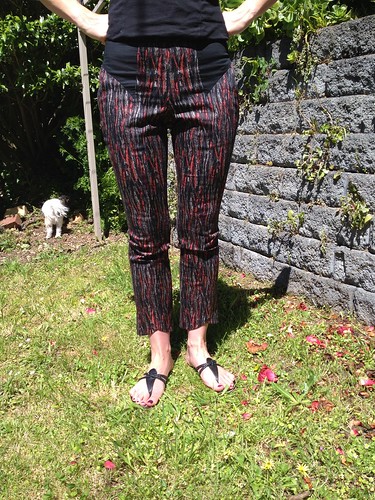
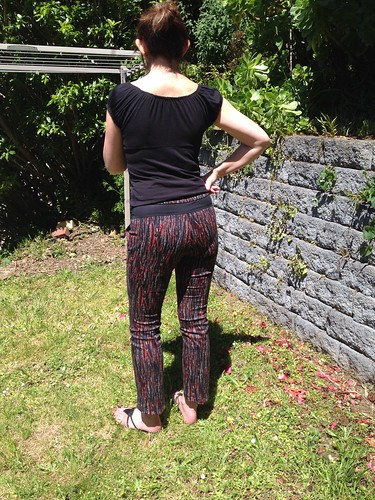
I really like the length of the Belcarra, it just hits the body in the right place that can hide 100 sins.... like these pants. These are the Elle Pant from Style Arc. I ordered a size 12, based on my hip measurement. Given that they were such a basic pant pattern I figured what could go wrong - well that's a rather naive attitude it seems. Just look at this - not to hard now!!!
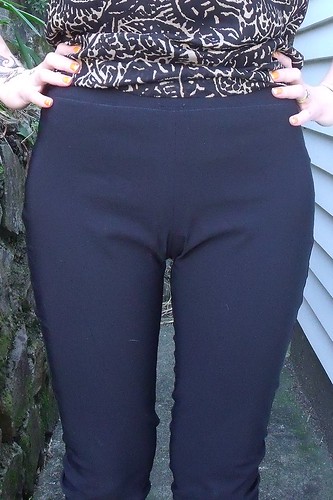
And this is with some adjustments after I sewed them together. I trimmed about 1/4" off the front and back pattern pieces, so 1/2" per side. I also trimmed about 1/4" off the inner thigh near the crutch, but I didn't alter the crutch at all as that seemed to fit comfortably. But I've still got all that excess fabric around the crutch???
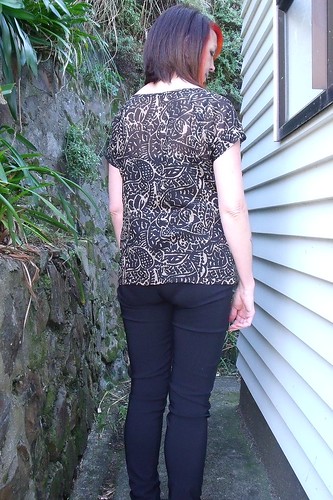
I think I've figured out that I've got too much fabric in the back pieces and could essentially just shave the back pattern pieces along the side seam, probably through to just below the knee - I wouldn't want the calf area to be any tighter. I really do need to read more on pant fitting. I took a Craftsy class but it was way too loose for me to grab anything really tangible. If anyone can recommend a really good pant fitting book that would be amazing; while I've sewn a few jeans, a couple of leggings and now these the perfect fits is still alluding me. Whatever adjustments I have made aren't really addressing my problem.
For now though these Elle pants are wearable with long tops.
More photos on my Flickr -->
Showing posts with label pants. Show all posts
Sunday, 17 August 2014
Saturday, 8 March 2014
Wolfies on the Longside
This was going to be my Project Sewn entry for the shoe inspiration challenge - but life got in the way and I didn't get photos taken and edited in time to add the link.
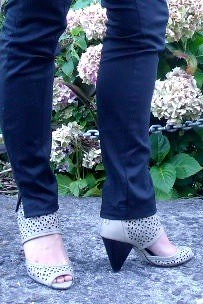
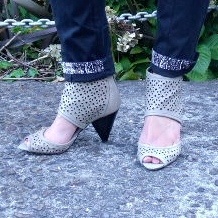
The shoes are Mia Piaci that I got on my last trip to Auckland. You may have seen them on my Instagram feed! I totally love them. Let me show you a close up ...
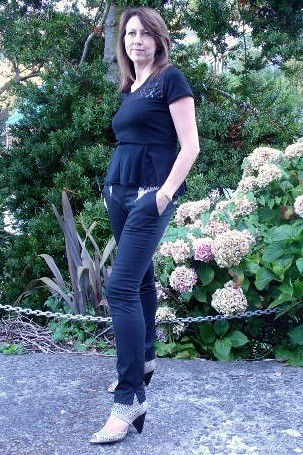
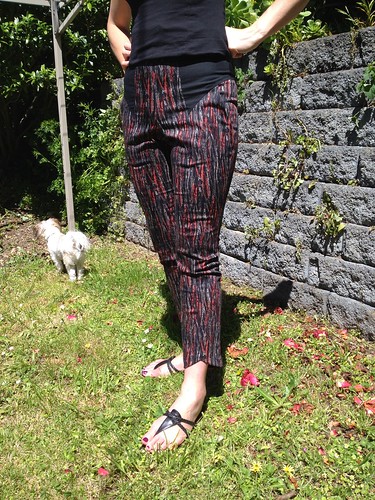
These shoes look best with a skinny jean/pant, so I decided it was time for a couple of pattern hacks, ha-ha-ha!
The pants are Peter and the Wolf by Papercut patterns. I made my first pair of Wolfies in December, you can read about my first dance with this pattern here.
The first pair was made straight out of the box. The fit needed some small tweaks to move fabric from the front to the back, but the bones of the pattern were good. I needed to add some depth to the back and remove some length from the front in the high hip and waist region.
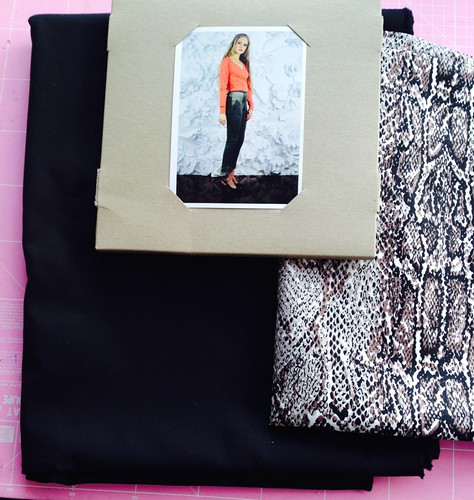
For the second pair I picked up some heavy black cotton sateen and snake skin print from the Arthur Toye closing down sale.
I'm not a huge fan of the 3/4 leg pant, so this time I wanted to convert the pattern to a skinny fit. Changes to the pattern included:
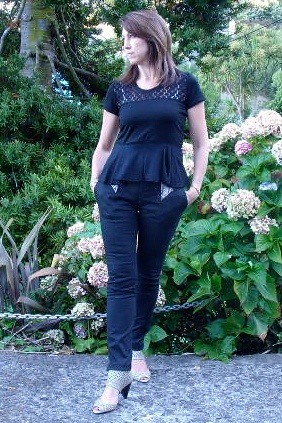
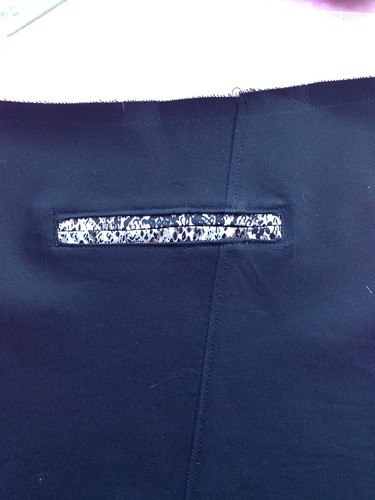
I also attempted to put in some faux pocket openings in the back, copying a concept from one of my ready to wear jeans. This was a bit of a fail! They look okay from a distance and give the look I was trying to achieve but don't look to closely at them, cause they aren't pretty.
For the leg hem I used a self-drafted facing and included a small side split. I'm really liking the hem facing concept, it gives a really nice crisp line. I used a bit of contrast fabric for the front facing, just cause I could :-)
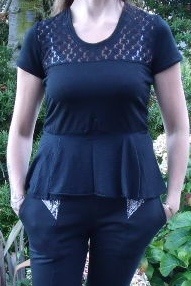
I made an Ensis tee (pattern hack) to wear with these pants. After my other recent Ensis Tee, I wanted to play a bit more with the lace concept. This time I selected a black merino and some left over stretch lace from this dress. I hacked this pattern quite severly ...
I had a slight hiccup in that I didn't quite have enough of the merino that I got from The Fabric Store and had to use some that I just purchased from Arthur Toye. They are slightly different in quality and colour - not that I think anyone but me will notice.
I'm not that in love with this tee. I didn't allow any fabric for the bust so the seam at the front waist is higher than the back. I kinda wish I had made it without the peplum. I have more merino and more of the lace so I might just do that yet.
More photos on my Flickr --> I used a different camera for these resulting in smaller images than usual. I must work out the setting, or get another camera!
The shoes are Mia Piaci that I got on my last trip to Auckland. You may have seen them on my Instagram feed! I totally love them. Let me show you a close up ...
These shoes look best with a skinny jean/pant, so I decided it was time for a couple of pattern hacks, ha-ha-ha!
The pants are Peter and the Wolf by Papercut patterns. I made my first pair of Wolfies in December, you can read about my first dance with this pattern here.
The first pair was made straight out of the box. The fit needed some small tweaks to move fabric from the front to the back, but the bones of the pattern were good. I needed to add some depth to the back and remove some length from the front in the high hip and waist region.
For the second pair I picked up some heavy black cotton sateen and snake skin print from the Arthur Toye closing down sale.
I'm not a huge fan of the 3/4 leg pant, so this time I wanted to convert the pattern to a skinny fit. Changes to the pattern included:
- removing 1/4" from about the centre of the front crouch seam, by creating a hinge. I dropped the crouch at the inner leg seam by 1/4" to put back the same amount of fabric I had taken out.
- I lowered the centre front by 3/4" and the front leg seam by 1/2" tapering up to the original height of the side seam.
- I added 1/2" to the centre back seam, about 2" below the top edge.
- I added 6" to the length and tappered all four pieces so the circumference around my ankle was 9" in total.
- Added 5" to the waist band because the pants now sit on my hip rather than my waist.
- Added belt loops.
I also attempted to put in some faux pocket openings in the back, copying a concept from one of my ready to wear jeans. This was a bit of a fail! They look okay from a distance and give the look I was trying to achieve but don't look to closely at them, cause they aren't pretty.
For the leg hem I used a self-drafted facing and included a small side split. I'm really liking the hem facing concept, it gives a really nice crisp line. I used a bit of contrast fabric for the front facing, just cause I could :-)
I made an Ensis tee (pattern hack) to wear with these pants. After my other recent Ensis Tee, I wanted to play a bit more with the lace concept. This time I selected a black merino and some left over stretch lace from this dress. I hacked this pattern quite severly ...
- For the top pieces and sleeves I cut a XS - the fit of my previous tees where perfect.
- The body needed to be a closer fit, so I cut the bottom body pieces down to a size XXS.
- I had to reduce the upper body pieces under the arm to a size XXS, which now means my sleeves wouldn't fit, so I added the extra 5/8" back into the armseye by lengthening the top body pieces under the notches.
- I dropped the neckline by 2"
- The bottom body pieces were shortened to the waist so I could add a peplum.
- I decided to take the peplum from the Cake Hummingbird pattern
I had a slight hiccup in that I didn't quite have enough of the merino that I got from The Fabric Store and had to use some that I just purchased from Arthur Toye. They are slightly different in quality and colour - not that I think anyone but me will notice.
I'm not that in love with this tee. I didn't allow any fabric for the bust so the seam at the front waist is higher than the back. I kinda wish I had made it without the peplum. I have more merino and more of the lace so I might just do that yet.
More photos on my Flickr --> I used a different camera for these resulting in smaller images than usual. I must work out the setting, or get another camera!
Tuesday, 3 December 2013
Wolf in the Wardrobe
So, Papercut Patterns added this new feature to their website "Made by You" and all you have to do is add the hashtag #iheartpapercut to your instagram post and your pic appears on their website. This is such a cool feature - especially for those of us who are in love with Papercut Patterns. Anyways, getting to my point, my pic of my Circle Tops (red and black) got selected as a winner and I got to choose a free Papercut Pattern.
This was such a difficult decision, but in the end I chose the Peter & the Wolf Pants.
I get really nervous when I make pants, cause if they don't fit straight out of the box I haven't really got it together enough to know how to go about making adjustments. So thankfully they are wearable.
I chose a stretch cotton sateen from the Fabric Warehouse that I actually brought specifically for these pants. The contrast is a stretch cotton and was probably just a wee bit to flimsy, but not that you can tell when I'm wearing them.
I made these on Saturday afternoon and worn them all day Sunday. Initially I was really critical of them but they were actually quite comfy to wear.
I think the length is popular this summer and can be worn with a flat for a casual look or a heel for more of a dressy look. I am 175cm tall and this length is exactly as the pattern provides. I made a size small.
The pattern was a breeze to whip up. The trickiest part would be attaching the front contrast and just because they are two curves bending in opposite directions. So now is the time I should fess up to a wee boo boo! I did read the pattern that said a 1cm seam allowance was provided, but when I got to driving the sewing machine I still stitched them up using a 1.5cm seam allowance. It wasn't until I got to the side seams did I realise I was in auto pilot mode! So the poor side seams are probably only .8cm. Apart from being a bit tight around the lower thigh the fit if comfortable.
There is probably a bit too much fabric in the front which could be moved to the back, if I just knew what to adjust to fix that!
I haven't got many good photos, because my photographer daughter just wasn't interested in helping me out. So there are a few more photos on my Flickr (far tooooo many butt shots than I feel comfortable with, but oh well I was grateful for any at all this day.
This was such a difficult decision, but in the end I chose the Peter & the Wolf Pants.
I get really nervous when I make pants, cause if they don't fit straight out of the box I haven't really got it together enough to know how to go about making adjustments. So thankfully they are wearable.
I chose a stretch cotton sateen from the Fabric Warehouse that I actually brought specifically for these pants. The contrast is a stretch cotton and was probably just a wee bit to flimsy, but not that you can tell when I'm wearing them.
I made these on Saturday afternoon and worn them all day Sunday. Initially I was really critical of them but they were actually quite comfy to wear.
I think the length is popular this summer and can be worn with a flat for a casual look or a heel for more of a dressy look. I am 175cm tall and this length is exactly as the pattern provides. I made a size small.
The pattern was a breeze to whip up. The trickiest part would be attaching the front contrast and just because they are two curves bending in opposite directions. So now is the time I should fess up to a wee boo boo! I did read the pattern that said a 1cm seam allowance was provided, but when I got to driving the sewing machine I still stitched them up using a 1.5cm seam allowance. It wasn't until I got to the side seams did I realise I was in auto pilot mode! So the poor side seams are probably only .8cm. Apart from being a bit tight around the lower thigh the fit if comfortable.
There is probably a bit too much fabric in the front which could be moved to the back, if I just knew what to adjust to fix that!
I haven't got many good photos, because my photographer daughter just wasn't interested in helping me out. So there are a few more photos on my Flickr (far tooooo many butt shots than I feel comfortable with, but oh well I was grateful for any at all this day.
Saturday, 20 July 2013
April Pant in July
After my success with the Jalie Jean I was super keen to get onto another pant - in comes the April Pant (legging) from Style Arc.
I made a wearable muslin from cotton lycra. The fabric was in my stash - I had purchased metres of it to make some basic long sleeve Renfrew for winter undergarments, umm still getting to those! The cotton lycra is okay but has a relaxed feel about them. The weight means they will probably be okay for spring or autumn.
The pattern recommends a Ponte, but I didn't have any in my stash. However, I can imagine with a Ponte it will give a snugger fit. I did make an adjustment to my pattern and took out some of the ease at the waist, hip and upper thigh before continuing on with my next pair.
The fabric for my 'real' version is a propylene merino blend and I would say is the same weight as a ponte. The fabric is reversible, so I went with the black for the main colour and the reverse side is a dark grey which is used for the inner leg and side panel.
The fit on the other hand is almost perfect. I have 'zero butt' syndrome and there is still just a little more ease around the bottom of my butt than needs to be. I think when I make my next pair I might shave a further 1/4" off the side seam.
While they look like a simple legging they feel A-maz-ing! I believe this is because they have a horizontal seam just above the knee and at the back of the knee, an inner leg insert and a side panel. All those seams = sturdy warm feeling.
These are really hard to photograph because they are black! So not many photos of these.
This is my first Style Arc pattern because the postage is really high - to compensate each month they give away a free pattern with every order.
I am super impressed with the pattern and fit. The package is nothing special, but included is a swatch of the recommended fabric for the garment. The instructions were pretty easy to follow, however no visual images to help. It kinda reminded me of sewing from the Burda Magazine, but the language was easy to follow and understand. The pattern only comes in the size that you order, not the multi-size patterns we are use to these days. On these pants there were lots of notches which made construction really easy. Overall, I would definitely buy more from Style Arc and looking forward to sewing up my second pattern.
I made a wearable muslin from cotton lycra. The fabric was in my stash - I had purchased metres of it to make some basic long sleeve Renfrew for winter undergarments, umm still getting to those! The cotton lycra is okay but has a relaxed feel about them. The weight means they will probably be okay for spring or autumn.
| all black - nothing much to see! |
The pattern recommends a Ponte, but I didn't have any in my stash. However, I can imagine with a Ponte it will give a snugger fit. I did make an adjustment to my pattern and took out some of the ease at the waist, hip and upper thigh before continuing on with my next pair.
The fabric for my 'real' version is a propylene merino blend and I would say is the same weight as a ponte. The fabric is reversible, so I went with the black for the main colour and the reverse side is a dark grey which is used for the inner leg and side panel.
| over exposed so the contrast panels are visible |
While they look like a simple legging they feel A-maz-ing! I believe this is because they have a horizontal seam just above the knee and at the back of the knee, an inner leg insert and a side panel. All those seams = sturdy warm feeling.
These are really hard to photograph because they are black! So not many photos of these.
This is my first Style Arc pattern because the postage is really high - to compensate each month they give away a free pattern with every order.
I am super impressed with the pattern and fit. The package is nothing special, but included is a swatch of the recommended fabric for the garment. The instructions were pretty easy to follow, however no visual images to help. It kinda reminded me of sewing from the Burda Magazine, but the language was easy to follow and understand. The pattern only comes in the size that you order, not the multi-size patterns we are use to these days. On these pants there were lots of notches which made construction really easy. Overall, I would definitely buy more from Style Arc and looking forward to sewing up my second pattern.
Tuesday, 16 July 2013
PJ's Sewaholic Style
More sewing for my 'mini me' (don't tell her but I really wanted any excuse to make this pattern ... sssh). It is winter here in NZ and there is nothing better than a warm pair of PJ's to hang around the house in.
I really love the piping feature of this pattern - I just think it adds a touch of class to the simple PJ. Hey and who doesn't want to look their best when they go to bed!
I made the piping myself (using my new piping foot for my machine). The only thing doing this is there is quite a bit of unused fabric.
This was really, really easy to do - in my opinion it was far easier to make piping than bias tape! I used a lemon yellow poplin from Spotlight. The flannelette I also got from Spotlight, who by the way have a huge selection.
These PJs are really easy to make, with lots of straight line stitching. The only fiddly bit is threading the elastic and tie through the waist band casing.
The legs have a decent amount of length on them. I had to cut a good 2" off the bottom before hemming - these are a size 12.
Excuse the night photos, but I wanted to get some photos before she worn them to bed!
I really love the piping feature of this pattern - I just think it adds a touch of class to the simple PJ. Hey and who doesn't want to look their best when they go to bed!
I made the piping myself (using my new piping foot for my machine). The only thing doing this is there is quite a bit of unused fabric.
This was really, really easy to do - in my opinion it was far easier to make piping than bias tape! I used a lemon yellow poplin from Spotlight. The flannelette I also got from Spotlight, who by the way have a huge selection.
These PJs are really easy to make, with lots of straight line stitching. The only fiddly bit is threading the elastic and tie through the waist band casing.
The legs have a decent amount of length on them. I had to cut a good 2" off the bottom before hemming - these are a size 12.
Excuse the night photos, but I wanted to get some photos before she worn them to bed!
Subscribe to:
Posts (Atom)