After I got the muslin fit to where I was comfortable - that alone was a 5 week journey, on 25 April I got to cut my real fabric. While that sounds quite straight forward, sadly not because of my fabric choice. I bought this lovely wool coating from The Fabric Store - it's so soft and bouncy with a medium weave - so it easily frayed but not so much that it was uncontrollable.
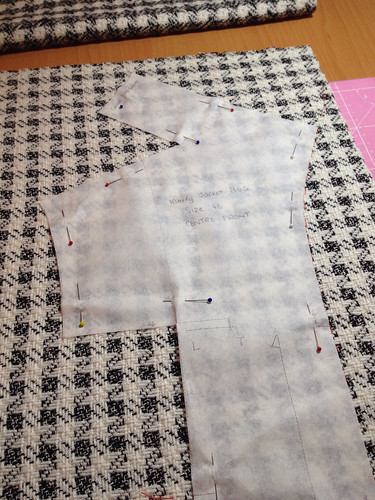
I cut all pieces on a single layer, carefully ensuring I had all the squares in the right places for each piece. While this was a little time consuming it wasn't too hard - the pattern pieces didn't have any seam allowances, so where the pattern piece fell was indeed the stitching seam.
 |
| Pattern matching at centre back |
After I thread traced and cut the fabric it then sat on the shelf for weeks while I tried to decide how I was going to construct it. I couldn't decided to make a quilted Chanel inspired jacket (LFJ) or whether to take a more tailored approach. This was my too hard point - I couldn't see how my fabric could be tailored but I could see how it would work as a LFJ; but I couldn't see how the collar would work if it wan't tailored ... *brain explode*
Finally, I decided to wait for the sew-along to get to this point, and take some wise direction from Leisa. There it was, tailor the jacket! Part of me was jumping up and down because I could sew the lining together using the machine and then insert, rather than having to hand-stitch each seam of the lining as is required for a LFJ; another part of me was still unsure how the pile of this fabric would behave. What the hell ... just do it!
Leisa wrote this amazing post about pad stitching the collar. This was like a light bulb moment! The collar would behave differently depending on the direction of the stitches. I decided that I wanted the back of my collar to stand up and the front to have a beautiful soft roll.
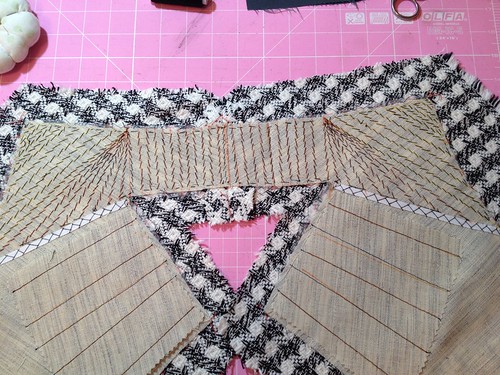 |
| Pad stitching a stand up collar |
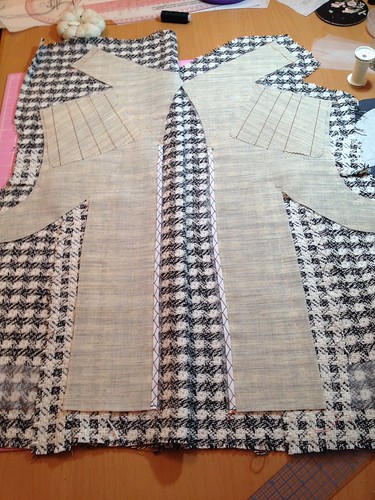

The sleeve of the jacket is a one piece, which is okay, but next time I would definitely convert to a two piece and add some elbow ease.
 |
| inside of jacket |
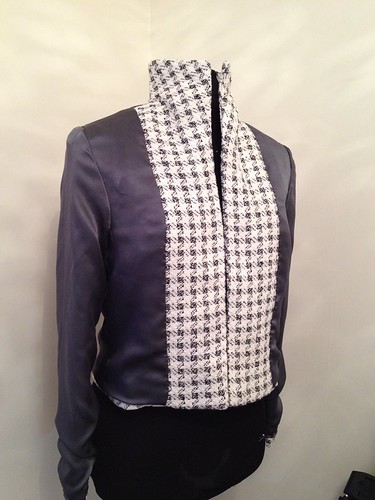
Now it is 29 June and I'm finished the construction of the jacket, only to be faced with my next dilemma ... what trim to use. I initially thought I would use a sold black grossgain or satin ribbon and attach very close to the edge. I bought enough of both to try, but once I pinned it in place I didn't like it - it was just too heavy for the jacket. So once more, the jacket just hung around waiting for me to make the next decision. Finally I settled on these small round fabric bobble buttons - they're just giant knots really. I was going to place a loop on one side so the jacket would close, but couldn't get that to work. I ditched the loops and just went with the buttons, so for now the jacket doesn't close and I'm okay with that.
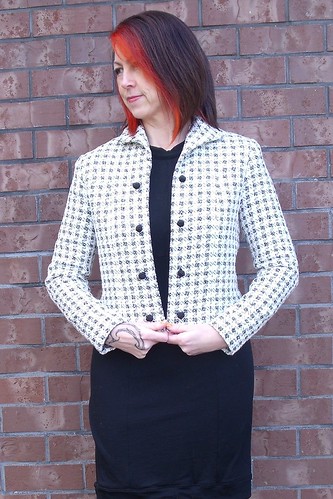
I also decided that the jacket didn't need the patch pockets - less is more! I love it :-)
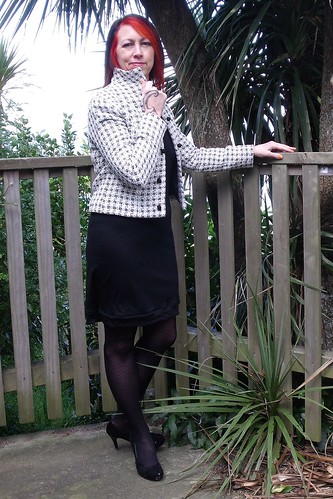
I finally finished the jacket on 19 July and have worn it a few times since - I never really know how I feel about anything until I've worn it a few times. It is super warm - most definitely a winter jacket.
Would I make this pattern again - you bet I would. Next time I would:
- add a wee bit more ease to the back, possibly return the princess seams on the back to the original size 46
- widen the arm at the bicep and convert the sleeve to a two piece pattern
- lengthen jacket to original length of pattern - this version is 3" shorter
I've never owned a jacket even remotely similar to this, so I feel real grown up when I wear it!
Way more photos over on my Flickr -->
oh, this is beautiful! the tailoring looks great, and i love that you can control so precisely with the pad stitching. nice work!
ReplyDeleteThanks Lisa, I really enjoy this type of sewing, but a little bit of instant gratification going down well right now.
DeleteGorgeous!! Your pad stitching is a work of art!
ReplyDeleteThe more I learn about hand stitching like this, the more I am completely blown away by the results. I loves it.
DeleteSo amazing! Your tailoring always blows my mind! :)
ReplyDeleteThis has completely surprised me. I had some definitely ups and downs during the make, but in the end I am totally in love, but looking forward to doing things better the next time.
DeleteGorgeous jacket, love how you have "tailored it".
ReplyDeleteThanks Sharon, these tailoring skills are all new to me and I am completely amazed at the result.
DeleteYou inspire me to get to work on a tailoring project that has been sitting too long. Your jacket is so pretty.
ReplyDeleteYou should so finish your jacket - it's slow going but the rewards are just too awesome.
DeleteA work of art, it's amazing what you've put into this and the results speak for themselves. It's amazing!
ReplyDeleteThanks Joy :-) I'm blown away, every time I wear it, that I actually made it!!
DeleteWow, I can't believe this is a FREE pattern! When you lay the pattern pieces out, they look so strange and funky, but then.....badda boom, badda bing, what an amazing jacket! Great work on fit and I love the collar option you chose. Subtle and you can put it up. NICE!
ReplyDeleteI know right - a free pattern that looks this good. It was just luck that I'd made two Bellatrix Blazers this year and that pattern also had this same collar construction, so I felt reasonably comfortable about how to construct it. It's it amazing how everything just ends up in its natural order of being ...
DeleteWhat a great looking jacket and the pattern is free...even better! I love the fabric you chose. It looks lovely and warm.
ReplyDeleteThanks Andrea. This is definitely a winter jacket - I can wear it over a sleeveless dress and stay nice 'n warm.
DeleteOh Sandra!!! I think my heart just skipped a beat. What a BEAUTIFUL jacket!! I love seeing the different shapes of the pad stitching on this collar - it really is such a flattering jacket on you. Amazing work!
ReplyDeleteThanks Melanie, I can't believe that I actually made this - I'm still getting to grips with how this is all possible! But I really love this type of sewing, it is so satisfying.
DeleteYour jacket is beautiful. I love the tailored look.
ReplyDeleteThanks Angela, I've worn it a few times and and it just sits beautifully, all the hard word is sooo worth it.
DeleteWonderful job! This jacket looks beautiful on you.
ReplyDeleteThanks Ramona, I'm lovin the length as well - it works lovely with my dresses.
Delete