
Say hello to my very first Little Black French Jacket! Total hours to completion 55, which I'm pretty happy about, because before I started I expected it would take about 75!
In December when I was at 38 hours I made this progress post if you want all the details before now. When I last left off I had just set-in the sleeves ... well, let me tell you, I had real problems getting the inside lining to sit just right on these suckers! After wrestling with it for a few hours and reading Leisa's post over and over and over, I decided it was time for a different approach and consulted Claire Shaeffer's DVD "The Couture Cardigan Jacket" - I decided her method was a winner and final got it all in place, not as pretty as I would have like, but none the less the sleeves were in and the lining closed - who's gonna see it anyway, as long as the sleeves don't fall off while being worn, right?!

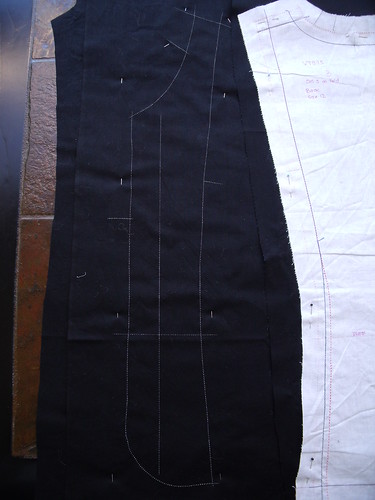
I finally made a decision about the bottom front. Initially I drafted a rounded edge as you can see below, but as the jacket came together, I just wasn't sure. In the end I went with my gut instinct and advice from follow sewcialists and squared it off.
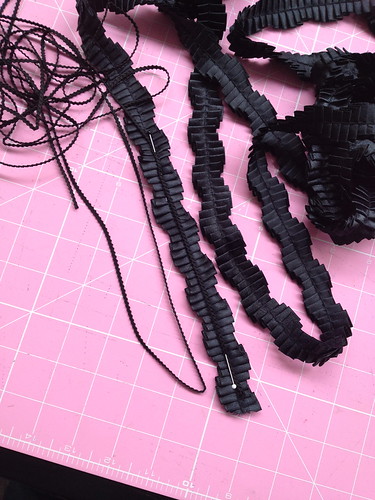
The trim I found at The Fabric Warehouse - some pre-pleated satin ribbon, over which I laid some tiny gimp. I love that the ribbon is 'wavey' and not just a simple straight line.
I also decided not to apply the trim around the bottom of the jacket, probably a bit OTT!

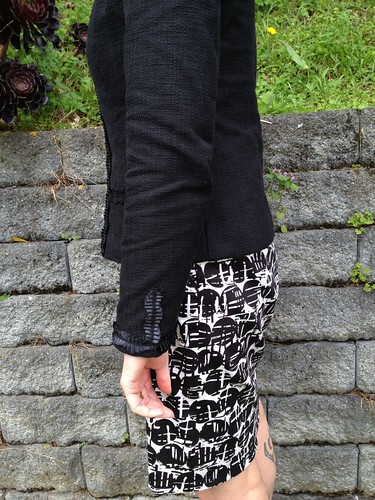
The Vogue pattern I used only provided for a two piece sleeve which meant no sleeve vent, synonymous with the LFJ. I was okay with this for my first jacket, but thought a faux vent would do the trick. A three piece sleeve has a seam that runs from the top of the sleeve, where it joins the shoulder seam, straight down to the cuff which is where the vent is constructed. My faux vent is located in exactly the same place with a strip of trim running perpendicular to the cuff.
I made a few booboos along the way, like cutting the lining inside out - but luckily the lining was almost identical on the right and wrong sides, so you can't really tell. I used a broadcloth as an interlining - I thought this would give the jacket some stability that I was looking for. Oh it has definitely done that, but way more than necessary. I should have just used it for the centre front pieces. On the up side, it is super warm to wear. I would set-in the sleeves differently next time and follow the Claire Shaeffer method to the letter - it is the last thing she does after closing the jacket and adding all the trim. I think this would work better for me.
I must give a HUGE thank you to both Inna and Leisa for the sew-along - the amount of information shared by both was just invaluable and totally enjoyable.

I love my LFJ and have worn it at every opportunity since it was finished in early January. Now that I've got all my rookieness (that is totally a word!) out of the way I'm really looking forward to making my next one using the free Marfy pattern, starting in March. For now I'm sewing pants for The Monthly Stitch 'Smarty Pants February'. You can join me on Instagram for up to the moment progress and hopefully I can get all three complete.
More photos on my Flickr -->
You did a great job! I like it a lot. I will hopefully get around to making one one of these days.
ReplyDeleteThanks. It's definitely one of those projects that you have to be ready for, but I reckon it is totally worth it.
DeleteBeautiful jacket Sandra! I really like the lining you chose too.
ReplyDeleteThanks Heather, I thought I needed something to funk up what would otherwise be a simple black jacket.
DeleteThe jacket is so cool! I like its classic look paired with funky lining :) A girl always needs one of these jackets, doesn't she? I could not agree with you more about setting the sleeves: it's such a pain! But, as you said, nobody will see how the lining is attached, even if the stitching is not perfect. All in all, this is a great garment which will get lots of wear!
ReplyDeleteAbsolutely - I think every girls needs one of these jackets in her wardrobe. Thanks so much for hosting the sew-along, I learnt so much and at a great pace to really take-in everything.
DeleteThis is gorgeous Sandra! You're really inspiring me to make my own make this jacket. I like that it's more fitted than the ones I've seen. Great job! I'm sure all the work you put into it is oh so worth it! :)
ReplyDeleteThanks, initially I thought I may have made it too fitted but I'm super happy with the fit. I too didn't want it to be too loose.
DeleteWow, Sandra, this jacket is absolutely fabulous, great job!! The lining looks terrific, you can't tell at all it is inside out. And, I love the trim you added to it. Rock the jacket now!!
ReplyDeleteThanks Catja - I really love my jacket and have been wearing it with just about anything from jeans to dresses.
DeleteWhat a great job! It looks fantastic. The fit looks great too. I made a little French jacket about 18mths ago so I know how much work goes into them. But I was much more inexperienced at fitting my clothes back then and it ended up too large, a major disappointment, but still the most wonderful learning experience. I love your choice of trim.
ReplyDeleteThanks! I learnt so much during this project and I realised that I actually like hand-sewing, it's so therapeutic. I hope you will make yourself another that is a better fit.
DeleteWhat a gorgeous fit and style. It will look great paired with dresses and even jeans. It'll prove a great accessory.
ReplyDeleteThanks. I've worn it in the weeked and to work and it just doesn't look out of place. I love it :-)
DeleteThis is so stylish. The trim looks great, i too like the fact that it wiggles. Again i bow in amazement at your sewing stamina...50 hours on one project!
ReplyDeleteThanks :-) I definitely did other garments along the way, I'm not sure I could only work on one of these jackets from start to end, but I certainly enjoyed the process.
DeleteGorgeous, great job :)
ReplyDeleteThanks :-)
DeleteFantastic job. Your jacket is classic and beautiful. Loving the lining.
ReplyDeleteRamona
Thanks Ramona. I like that description 'classic and beautiful' I think if I was going to describe my style those two words would definitely be in the mix.
DeleteIf you'd spent 155 hours it would be worth it. Your jacket is so classy!
ReplyDeleteThanks Gail - I agree, if had taken me twice as long I would still feel the same way about it. It's one of those projects that you know is going to take a while.
DeleteSo classic and elegant, with a contemporary twist - it's astonishing! And I admire your stamina too - I've invested that effort into knitting but never into sewing. You're going to be able to style this so many ways! So congratulations to you on a fine achievement.
ReplyDeleteYes it is a bit like knitting, you know you will finish but you don't expect a quick result and it is quite relaxing to just taking your time with something. I perspective I never had 18 months ago!
DeleteIt is beautiful! The fit is wonderful, too. I think the time you invested really paid off.
ReplyDeleteThanks Laura - are you starting yours soon? I love the fabric you have.
DeleteHopefully I will start it soon. I still haven't bought lining fabric. I will hopefully get some when I do my shopping at the end of the month. I should just start on my muslin. I have one I already started. Maybe I'll pull it out and try it on.
DeleteThat's a gorgeous jacket, and I LOVE the lining (would never have guessed it was the wrong side) Well done, 55 hours is a major investment but worth every minute.
ReplyDeleteThanks. I'm thinking funky lining might become my thing, I've got a few great fabric in the stash. I'm ready to do it all again in March :-)
DeleteBeautiful Sandra! What a classic look and all of your hard work paid off. I love that trim. ~Teri
ReplyDeleteThanks Teri! I can't believe that I actually made it.
DeleteStunning jacket!
ReplyDeleteThanks Sharon :-)
Delete