Showing posts with label cotton eyelet. Show all posts

Wednesday, 31 January 2018

Perfecting the Skirt and Rainbows

Kia ora! In December last year, after purchasing and watching the new Susan Khalje class on Craftsy "The Couture Lace Skirt", I pulled my unfinished skirt block from the depths of the muslin pile and decided I needed finish it. 

To be honest, I don't wear a lot of skirts which is why I've never bothered to finish it, but I really really really want a guipure lace skirt. I didn't want to start with having to find a skirt pattern then go through the fuss of fitting it for my body. The toile felt more than a little snug around the hips so I added 1/2" to the side seams of the pattern, giving a 1" ease, then got out some remnant fabric and proceeded to sew up a skirt. Hmmmm, it didn't fit!  It was way too big and almost fell off my hips. Yeah, I know, I should have done a fitting once I got the side seams together, but it was December and the end of a long year!  Anyway, I made some tweaks to the pattern, dived into the stash again for more fabric and made another - okay it was a boring black skirt! But hey, I made sure the lining was fun. And who doesn't need a black skirt, right.


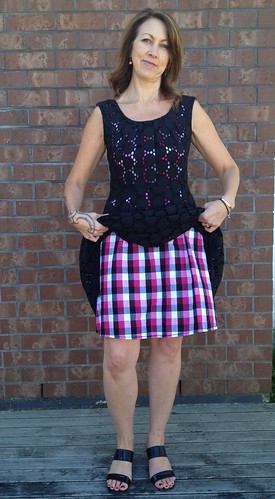
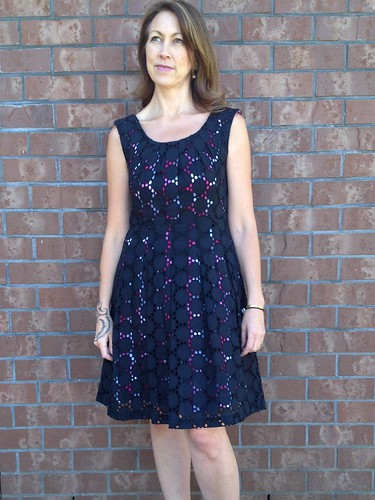
I made a couple more tweaks to the pattern before deciding it was time to test out Susan's techniques before fully committing to the guipure lace. Hello rainbow skirt 😎


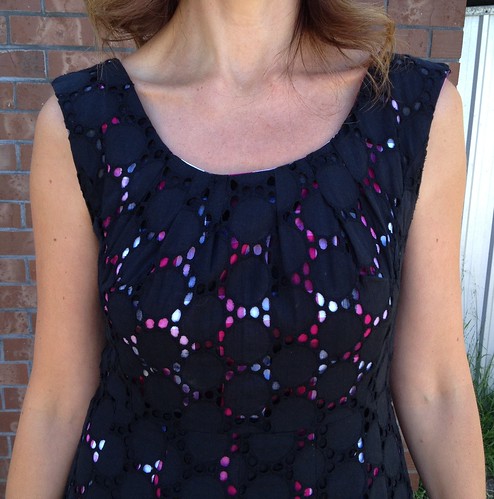
The rainbow eyelet I purchased from The Fabric Store in January 2017 with a thought to making a bomber jacket ... I never did make it. I then found this very cute cotton lawn with a small floral print - I've got no idea where it came from or when I purchased it, so I'm guessing because it didn't have one of my fabric stash tags it's been in the stash for quite ... some ... time!


First I cut out the cotton, put all the necessary markings on the cotton with one of those Frixon erasable pens, coz I love them, then placed the cotton pieces on the eyelet fabric and thread traced them together and treated them as one. I sewed in the darts and tacked the two pieces together by hand with rows of horizontal running stitches about 2 inches apart.


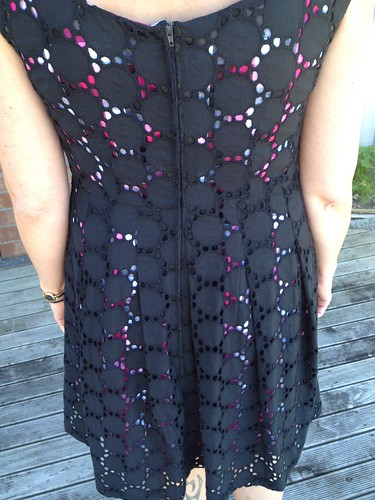
I finished everything except for the waist. I found some white striped acetate in the stash and constructed the lining. All three layers are secured together at the waist and finished with a piece of grosgrain ribbon, as recommended by Susan. The zipper is inserted by hand using a pick stitch (which is my favourite way to put in a zipper if I haven't already told you that before).


I am in love with the small floral underneath the eyelet 💖


You can't even really tell where the darts are. Well you have to look super close 👀


I wore the skirt to work for the first time this week. I totally enjoyed the fit of the skirt, the shape and the length. I think I'm ready now to make many more variations using my bock, but first I need to tackle the guipure lace skirt using all the applique techniques Susan teaches.


Until next time, happy sewing 😘

Tuesday, 14 January 2014

Plaid Peek-a-Boo Party

The December challenge over at The Monthly Stitch was "The Party Dress" (I know we are just about half way through January and I'm just getting this to the blog!)

I did start a formal party dress, but I've got fit issues with the bodice that I have to fix, so instead I made a completely new dress, one that I could wear on Christmas Day ... because I always, always wear a new outfit on Christmas Day.  This was most definitely one of those sew like crazy projects that I started just two days before needing to travel.

Untitled

Earlier in the year I purchased two yards of this beautiful circle eyelet fabric from Gertie's Etsy Shop.  The original plan was to line a dress with black siri purchased at the same time.  I love the fabric so much that I've been too scared to commit it to an actual pattern - believe me I've had many dresses made from this fabric in my head!  Eventually I settled on the Kay Unger Vogue 1353 pattern that I'd made before here.

Up until the point that I had constructed the eyelet layer of the dress did I change my mind on the lining.  I had laid a pattern piece on top of my muslin role, in one of those "I'll just put you over there for a moment" thoughts, and the contrast was like a sparkle in my eye.  At that moment I knew I just couldn't line this dress with black!   From my stash appeared this plaid ....

Untitled

I know, crazy right!  And believe me I did put it away a few times and tried other options, but I just kept coming back to this one.  I picked this up for $3 a metre at the summer Fabric Warehouse sale - and I have like six metres of it, so why not use it as lining?!

Untitled

I do love the way that you can't tell it is a plaid, it's just like the party of colour playing peek-a-boo through the holes. 

The construction was exactly the same as my previous Retro Geektastic make, but I ran out of time and had to leave home with one whole seam un-sewn!  Well, I did intend to sew it before I left but I got side tracked and then forgot.  So the seam of the lining from the bottom of the zipper to the hem has been hand-sewn using a back-stitch.  Then the raw-edges have been holded back and stitched down with a running stitch, the seam pressed open and catch stitched in place - there is no chance of fraying now!

Untitled

The hem of the lining I would have usually turned up and machine stitched, but no sewing machine meant that it was turned up and secured with a catch-stitch.  I wasn't sure what to do with the hem of the eyelet, so on Christmas Day I just wore it un-hemmed.  After wearing it for a day I decided that I did need to hem it and purchased some bias binding tape, turned the bottom of the dress up about 15cm and sewed the bias tape on the inside to hide the draw edge of the fabric.


The pattern provides for a really deep hem facing, which I understand gives the hem of the dress some body which helps accentuate the design of the dress.  Without the hem facing I thought I might loose that design feature, but now that I look at the photos, I think not!

Untitled

Perhaps this dress should be the Crazy Party dress!

More photos on my Flickr -->

Sunday, 31 March 2013

Cotton Eyelet Couture

I feel in love with this cotton eyelet fabric on one of my visits to Global Fabrics.  I wasn't too excited about it being brown but immediately found this dark chocolate cotton lycra blend - it just seemed perfect for my next couture dress using my skills acquired from the Craftsy Couture Dress class. 
The end result ... a beautiful fitting dress that I absolutely love - the only question now is what shoes to wear!


However, I must fess that I only put the silk organsa interlining on the top and midriff band.  I felt the cotton lycra fabric I used for the skirt was already heavy enough that it just needed a lining.   Doing this also balanced the weight in the two fabrics. The inside of the dress is also two toned. 
I inserted the lining completely by hand - although this takes longer it gives me far more control than trying to machine it in ... and far more satisfying (for me anyway).

Both were taken from my fabric stash.  The top lining was left over from my pattern morphing top and the bottom, I'm not sure what I originally bought it for!

The pattern is this Vogue Options Misse's Dress V8633.  Because I'm more of a rectangle shape I had to make adjustments to the midriff band and skirt.  While the pattern isn't recommended for the rectangular body shape I think that it has given my body some shape and gives the illusion that I do have a waist!
 
More photos - just 'cos I can
(shoes are undecided so none at this stage)
Love the stand up collar
The shape of the sleeve balances up the hips
When it gets a bit cooler I can pair this with my Minrou Jacket :-)